Google recently launched Flutter, a new technology that promises to be an ideal solution for building high-performance, highly realistic applications.
What is Flutter?
Flutter is defined as a cross-platform framework for user interfaces (UI), as well as an open-source software development kit (SDK). In other words, it allows you to develop applications for different platforms and operating systems, including iOS, Android, web, Windows, macOS, and Linux. Everything, from integrated code.
Advantages of using Flutter
Share code across different platforms – The ability to reuse code makes it easy for teams, even those without web development experience, to apply their knowledge in building mobile and desktop apps. The result? More optimized use of code.
Wide variety of customization options: With Flutter, it is possible to customize the web application to improve the user experience on each platform.
Focus on accessibility: Users look for accessible applications. Flutter excels at enabling precise designs and components, contributing to the development of an interface that meets a wide range of needs.
Hot reload: This functionality allows you to view changes to the code instantly, without having to restart the application.
Cost-effectiveness: Developers manage a single code base for iOS and Android, reducing costs.
Improved user and brand experiences: With its extensive set of fully customizable widgets, native interfaces can be designed in minutes.
For developers:
Single code base: facilitates time savings and ensures consistency across platforms.
Rich feature set: Gives you the freedom to create exceptional user interfaces with complex, custom widgets.
Strong community: Provides ongoing support to developers, making it easy to find solutions.
The Flutter Development Process: A Simplified Guide
Starting a project in Flutter can be challenging at first. For this reason, here we provide you with a simple guide that covers several key points. From SOLID and Clean Architecture to specifications, CLI tools, and project templates. We explain how to simplify the custom enterprise software development, testing, and release process.
SOLID
This theory is based on five basic rules of resource management (single responsibility, open closure, Liskov substitution, interface partitioning, and dependency inversion). In this way, each element must have a single responsibility and maintain a marked separation of interfaces in order to avoid direct dependencies.
Clean Architecture
This concept focuses on greater abstraction and modularity, allowing the software to be easily modified and updated without interrupting its operation.
Specifications
Also known as configurations, custom project parameters are defined here. These can be set in several ways, either by completing a file or during interaction between the command line interface (CLI) and a user. For example, when configuring a project, we could specify options such as the project template, run tools, or even integration with Git (Specifications Config <run> CLI tool <git> Project template).
Command Line Interface (CLI) Tool
This tool is automatically activated when starting a new project to configure the options in GitHub, essential for code generation.
Project Outline
For architecture, we suggest starting with schematics that show the connections between classes and interfaces in the software. Using a legend helps detect and resolve potential problems by incorporating UML elements used.
Additionally, it is vital to understand your tool to have a Swimlane diagram. These diagrams are important in representing processes, as they detail specific actions and their operation.
A clearly established process, divided into products with detailed activities for each level, will make it easier to track the algorithm’s journey.
Development
First things first:
Config: Details the creation of a new project. The user sets values and parameters by interacting with the Command Line Interface (CLI).
ConfigBuilder: facilitates the creation of objects sequentially, adding configuration parameters progressively.
MinimalConfigBuilder: This component implements the builder interface and adapts its methods to efficiently configure a basic structure, corresponding to a Minimum Viable Product (MVP). It is characterized by its minimalist approach, using only the fundamental parameters required for its operation.
Creator: This interface manages the creation of Projects, transforming an initial layout of templates into a specific configuration. It implements various behavioral scenarios while maintaining the standard interface, complies with the Liskov Substitution Principle (LSP) in SOLID, and optimizes future code management.
Job: used in the generation of the project, it allows adding sequences to form a more complex structure. For example, it is possible to modify a task, reorganize executions, or incorporate new elements without interfering with previous work.
Testing and Launch
To test the tool, upload it to pub.dev, share the repository, and distribute it to the team. Documents everything: architecture, state management, and lint regulations.
Design Considerations
Flutter offers advanced customization, ideal for designing dynamic interfaces. Its robust SDK is perfect for mobile app development.
Featured Features:
Impeller and Flame graphics engines: with this, you can render 3D objects and complex in-app graphics, maintaining a constant performance of 60-120 FPS.
In-app animations: Animations improve the user experience. With Skia and Impeller, implement fluid animations and perform real-time testing.
Material and Cupertino Widgets – Two styles available. Material for all platforms and Cupertino for an iOS style.
Precise Rendering: This feature allows designers to avoid SDK-specific settings. Flutter renders every pixel so the UI looks consistent across devices.
Development Considerations
After reviewing the Flutter development process, let’s look at some essential requirements for building an application on this platform.
Flutter SDK: First, get the Flutter SDK from its official site and follow the instructions for your operating system.
IDE: It is important to have an editor that offers compatibility with Flutter and Dart through various plugins and extensions. For example, we recommend Visual Studio Code (VS Code).
Flutter Doctor Command: Verify the Flutter configuration by running Flutter Doctor to ensure everything is correct.
How to select a provider for your Flutter project
When selecting a provider for your project, verify that they have the required skills and experience to develop the application according to your requirements.
Consider the following:
Native mobile development: experience is key. A provider with a track record in native applications understands mobile environments better and finds efficient solutions.
Multiplatform experience: a provider specialized in iOS and Android ensures a dual launch and knowledge of the particularities of each system.
Focus on Learning: since Flutter is an emerging and constantly changing software development solution, a provider that stays up to date and knows the optimal solutions for each case is vital.
In the modern business world, organizations are constantly looking for innovative ways to boost productivity and keep a competitive advantage. Integration of enterprise resource planning (ERP) is one such technique that is gaining popularity. Adetive Solution, renowned for its innovative technology and creative solutions, provides ERP solutions that smoothly integrate to optimize business processes.
Understanding ERP Systems to Maximize Efficiency
ERP Enterprise resource planning systems are comprehensive software solutions designed to integrate and streamline numerous factors of commercial enterprise operations. It gives a centralized platform to manipulate various aspects of the company. The integration of ERP systems represents a significant shift in how companies perform, from finance and human sources to supply chain management and customer relationship management, ERP systems consolidate information and tactics, presenting a complete view of the organization’s operations.
Adetive Solution has a specialty in developing ERP solutions to meet the precise needs of businesses. It can leverage the power of ERP systems to maximize the organization’s efficiency throughout various of its operations. With Adetive’s tailored solutions, businesses can automate repetitive tasks, get rid of manual tactics, and ensure seamless communication among distinct departments. This not only enhances efficiency but additionally reduces the chances of errors and delays, in the end leading to improved productivity.
Adetive’s expertise ensures easy implementation and customization, aligning ERP Enterprise resource planning solutions with the precise needs of every enterprise. With enhanced visibility and real-time insights, companies could make informed decisions to acquire sustainable growth.
Benefits of ERP Integration:
Efficient Resource Management: Adetive Solution’ expertise in enforcing ERP solutions allows businesses to efficaciously manipulate their resources. By centralizing facts and automating processes, businesses can allocate resources more effectively, leading to financial savings and stepped-forward decision-making.
Streamlined Workflows: Adetive’s proficiency in technology integration ensures seamless workflows across departments. With ERP systems, redundant duties are minimized, and data flows smoothly, resulting in faster response rates and more desirable collaboration amongst teams.
Enhanced Productivity: Adetive Solution allows businesses to increase productiveness through ERP implementation. By automating routine responsibilities and offering actual-time insights, employees can recognize value-added activities, using standard performance and overall efficiency.
Adaptive Expertise in Technology:
Adetive Solution brings extraordinary expertise in technology integration to the desk. With a deep knowledge of ERP Enterprise resource planning systems and their abilities, Adetive helps companies leverage the whole potential of these solutions. From custom-designed solutions to seamless implementation and support, Adetive Solution empowers organizations to unlock the entire ability of ERP systems.
By prioritizing scalability and adaptability, Adetive guarantees that ERP solutions can evolve alongside the business, accommodating growth and changing requirements. With Adaptive as a trusted partner, corporations can navigate the complexities of technology integration with confidence, driving innovation and efficiency at every step.
Whether it’s integrating existing systems or developing customized modules, Adetive Solution offers a comprehensive approach to ERP implementation, ensuring maximum efficiency and minimal disruption to enterprise operations. Adetive guarantees a seamless revel in for its customers.
Adetive Solution empowers corporations with real-time insights into their operations. This allows informed decision-making, as stakeholders have get right of entry to accurate and updated information at their fingertips.
Case Study: Optimizing Operations with Adetive Solution:
Let’s consider a manufacturing organization struggling with disjointed structures and manual processes. By partnering with Adetive Solution, the organization applied an ERP system tailor-made to its precise requirements. The results were splendid: manufacturing procedures have been streamlined, lead times have decreased, and inventory management improved. Adetive’s ongoing assistance ensured smooth operations, allowing the organization to stay ahead of the competition.
Conclusion
In Conclusion, the integration of ERP Enterprise resource planning systems provides a transformative opportunity for corporations to streamline their operations and increase productivity. With Adaptive Solution as a strategic partner, businesses can unlock the whole capability of ERP technology and might leverage ERP capabilities to optimize procedures and enhance productiveness. Businesses can then open up new growth possibilities and navigate the complexities of modern business with ease.
In this Opencart tutorial, we go through OpenCart Events, Opencart events are hooks that developers can attach custom code to, allowing them to execute specific actions at different points in the application’s lifecycle. Events can be triggered by various actions within the OpenCart system, such as user authentication, order creation, product editing, email sending, and more.
Event Types
Pre-Events:
Triggered before a specific action occurs. For example, a pre-event can be triggered before an order is saved, allowing developers to perform custom actions like validating order data.
Post-Events:
Triggered after a specific action occurs. For example, a post-event can be triggered after a product is edited, allowing developers to perform custom actions like updating related data.
Using OpenCart Events:
To use OpenCart events, developers need to create an event listener, which is a function or method that responds to a specific event. An event completes the tasks that a controller, a model, a theme override, a language, and a config needs to be achieved in the back-end of the store. Upon startup, the Engine automatically registers triggers, and actions, and sorts orders in both the admin/controller/startup/event.php and catalog/controller/startup/event.php files.
Event listeners are registered using the addEvent method from the Event class. The method takes three parameters: the event name, the class/method to be executed, and the priority of the listener.
Example Code:
// In your custom extension, add this code to the controller
$this->event->addEvent('catalog/controller/product/product/after', 'extension/event/custom_event/afterProductView');

// Define the event listener in your custom event class
class ControllerExtensionEventCustomEvent extends Controller {
    public function afterProductView(&$route, &$data, &$output) {
        // Custom code to execute after a product view
        // Example: modify the product data before it's rendered
        $data['custom_text'] = 'This is a custom message after product view.';
    }
}
Registering Events:
Events can be registered in an extension’s install method or directly in the controller if needed.
It’s important to unregister events in the extension’s uninstall method to avoid any unwanted behavior after removing the extension.
Using Events for Customization:
Developers can use OpenCart events to customize and extend the platform in various ways, such as:
Adding custom logic to product pages, checkout processes, or other areas of the platform.
Modifying data before it’s displayed to the user.
Integrating with third-party services or APIs.
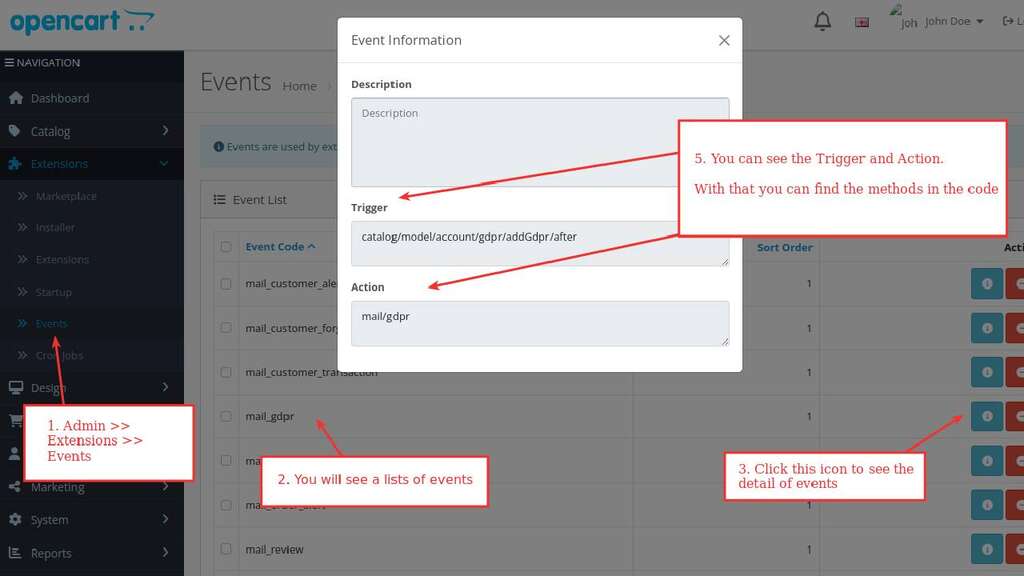
For developers, add event code, description, trigger, and action in the database. The action is the method which does what you want. The trigger is the path that you want for the existing Opencart controller and methods.
You can see all the events at >> Admin >> Extensions >> Events
List of Events
Catalog and admin events, here are the lists of Catalog events for different functionalities.
Language events
OpenCart’s language events system is an important part of managing and customizing language-related aspects of the platform. Language events allow developers to add, modify, or manipulate language files and translations within the OpenCart application. This is crucial for providing multilingual support and customizing text displayed to users.
view/*/before
Dump all the language vars into the template.
controller/*/before
Before controller load store all current loaded language data
controller/*/after
After controller load restore old language data
Activity events
OpenCart’s activity events system allows developers to monitor and respond to user activities and other important events within the platform. These events are useful for tracking user actions, generating logs, and performing custom operations based on specific activities. This system enhances the ability to understand user behavior, provide better support, and maintain the platform effectively.
Here’s an overview of OpenCart activity events and how you can use them:
Understanding Activity Events:
Activity events in OpenCart track significant actions performed by users, such as login, logout, product views, purchases, and more.
These events enable developers to create custom responses and logs based on specific user activities.
Common Activity Events:
customer_login: Triggered when a customer logs in. This event is useful for monitoring login activity or taking specific actions upon login.
customer_logout: Triggered when a customer logs out. You can use this event to perform cleanup operations or logging.
product_viewed: Triggered when a product is viewed. Useful for tracking product popularity or taking custom actions based on product views.
order_added: Triggered when a new order is added. This event can be used to log order information or trigger post-order processes.
customer_register: Triggered when a customer registers a new account. Useful for sending welcome emails or performing other onboarding activities.
Creating Activity Event Listeners:
To use activity events, create event listeners that respond to specific events of interest.
Register event listeners in your extension’s controller using the addEvent method from the Event class.
// Registering an activity event listener in your controller
$this->event->addEvent('customer_login', 'extension/event/activity/onCustomerLogin');

// Define the event listener method in your custom event class
class ControllerExtensionEventActivity extends Controller {
    public function onCustomerLogin(&$route, &$args, &$output) {
        // Custom code to execute when a customer logs in
        // For example, log the customer login event
        $this->log->write('Customer logged in: ' . $args['customer_id']);
    }
}
OpenCart’s theme events system allows developers to customize and extend the behavior of themes within the platform. By using Theme events, you can modify how themes render content, alter page elements, and integrate custom logic to achieve a unique look and feel for your store.
Here’s an overview of OpenCart theme events and how you can utilize them:
Understanding Theme Events:
Theme Events are hooks that allow you to customize the rendering of pages and elements in your OpenCart theme.
These events are triggered during different stages of the rendering process and provide opportunities to manipulate the data or layout before it’s displayed to users.
Common Theme Events:
view/*/before: Triggered before rendering a view file in a specific directory, such as catalog/view/theme/[theme_name].
view/*/after: Triggered after rendering a view file in a specific directory.
template/*/before: Triggered before rendering a template file in a specific directory, such as catalog/view/theme/[theme_name]/template.
template/*/after: Triggered after rendering a template file in a specific directory.
Creating Theme Event Listeners:
To use the theme events, you need to create event listeners that respond to the specific events you want to customize.
Register event listeners in your extension’s controller using the addEvent method from the Event class.
// Registering a theme event listener in your controller
$this->event->addEvent('view/common/header/before', 'extension/event/theme/customizeHeader');

// Define the event listener method in your custom event class
class ControllerExtensionEventThemeCustomizeHeader extends Controller {
    public function customizeHeader(&$route, &$data, &$output) {
        // Custom code to modify the header before rendering
        $data['custom_message'] = 'Welcome to our store!';
    }
}
Here are lists of Opencart theme events:
view/*/before
view/*/after
template/*/before
template/*/after
Here is the main code for the catalog that controls the theme events: upload/catalog/controller/event/theme.php
class Theme extends \Opencart\System\Engine\Controller {
	/**
	 * Index
	 *
	 * @param string            $route
	 * @param array<int, mixed> $args
	 * @param string            $code
	 *
	 * @return void
	 */
	public function index(string &$route, array &$args, string &$code): void {
		// If there is a theme override we should get it
		$this->load->model('design/theme');

		$theme_info = $this->model_design_theme->getTheme($route, $this->config->get('config_theme'));

		if ($theme_info) {
			$code = html_entity_decode($theme_info['code'], ENT_QUOTES, 'UTF-8');
		}
	}
}
Admin Currency Events
model/setting/setting/editSetting
model/localisation/currency/addCurrency
model/localisation/currency/editCurrency
Admin Statistics Events
admin/model/catalog/review/addReview/after
admin/model/catalog/review/deleteReview/after
admin/model/sale/returns/addReturn/after
admin/model/sale/returns/deleteReturn/after
Translation Event
OpenCart’s translation events system allows developers to customize and extend the language and translation aspects of the platform. By using translation events, you can modify or extend the existing translations, add new language strings, and customize language files to achieve a more personalized or localized experience for your store. Here is the main code that you can find at upload/catalog/controller/event/translation.php and upload/admin/controller/design/translation.php
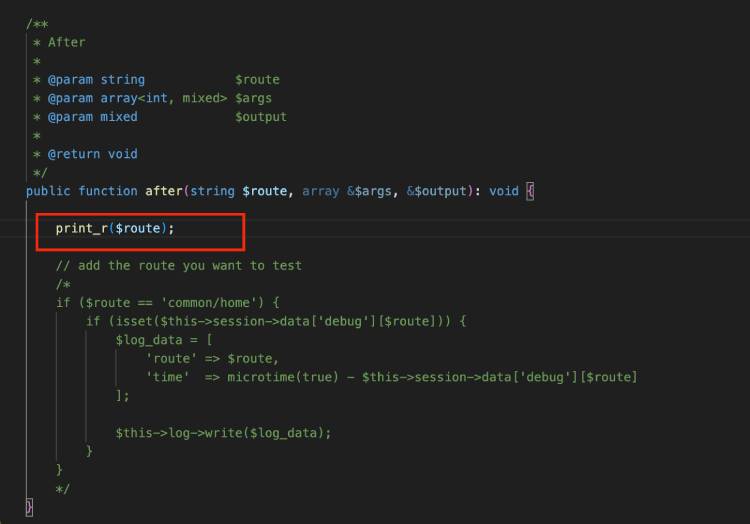
By default, in the system/config/catalog.php file, the debug key and value are commented out at the bottom of the file because they should only be active for debugging purposes. Remove the comment of the code like below:
After enabling debugging, you can test the code within the catalog/controller/event/debug.php file. You see the after and before methods. Here is an example of an after-method test to find all the routes used on the page.
It is essential to undo the changes of the debugging by commenting out the debugs line in the system/config/catalog.php file after testing.
Challenges
Performance Impact: Every event adds a layer of processing, which can slightly impact page load times, especially with numerous event handlers. Monitor performance and prioritize essential events to avoid noticeable slowdowns.
Debugging Complexity: Debugging problems within event handlers can be more challenging than traditional code because they may be triggered from different locations. Employ proper logging and testing practices to identify and resolve issues effectively.
Security Risks: Improper event handler implementation might introduce security vulnerabilities. Always validate and sanitize user input within event handlers to prevent potential security risks.
Maintenance burden: As your store and codebase grow, managing numerous event handlers can become complex. Organize your events and handlers logically, document their purpose, and update them regularly to maintain code clarity and avoid conflicts.
Version compatibility: While events strive for backward compatibility, updates to core files or other extensions might break event handlers. Thoroughly test your events after updates to ensure continued functionality.
Best Practices while using Opencart Events:
Use events judiciously: Don’t overuse events for simple tasks that can be handled efficiently within core files. Reserve events for extending functionality beyond core capabilities.
Write clean and efficient code: Optimize your event handlers for performance and avoid unnecessary processing.
Test thoroughly: Test your event handlers under various scenarios, including edge cases and potential conflicts with other extensions.
Document your work: Document the purpose and logic of your event handlers to facilitate future maintenance and collaboration.
Stay updated: Monitor changes in OpenCart and event-related functionality to adapt your code when necessary.
Google Sitemap module used to be by default added on Opencart 3 but in Opencart 4 we need to add it manually and we did not find it in Opencart marketplace so we created the module. Search engine optimization (SEO) plays a pivotal role in driving organic traffic to your online store. One of the essential tools in your SEO arsenal is a well-structured sitemap.
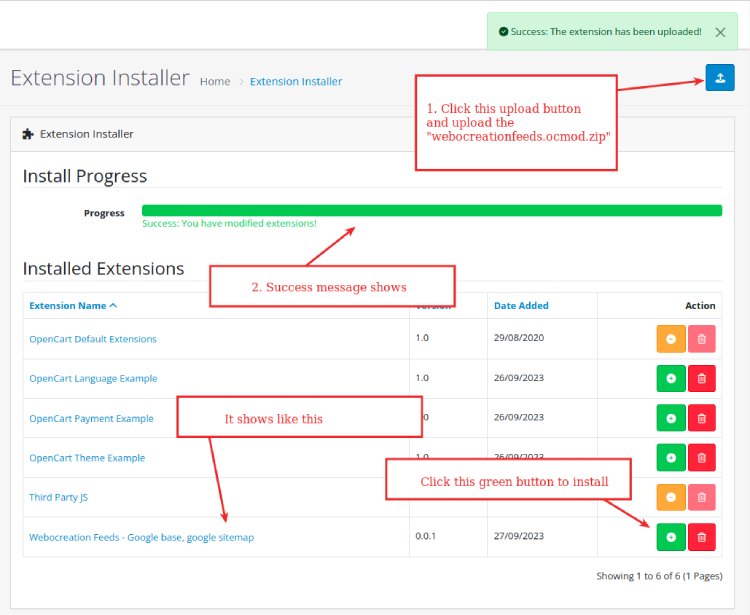
Click the above button to download the Google Base feed module, the file downloaded is webocreationgooglesitemap.ocmod.zip. Now go to the Opencart admin >> Extensions >> Installer >> Then upload the file webocreationgooglesitemap.ocmod.zip
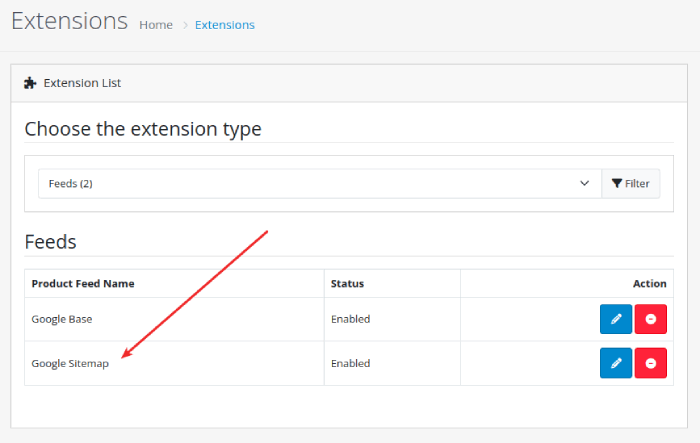
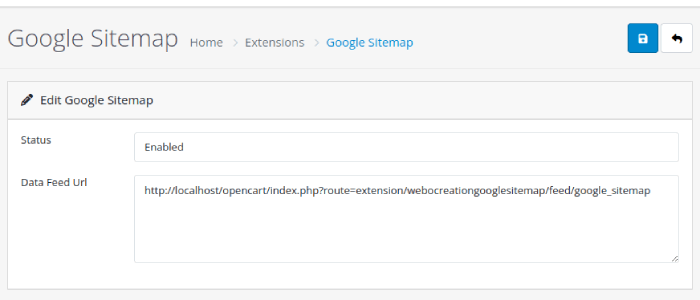
Once it is uploaded and installed. Go to Extensions >> Extensions and filter out to feed.
Click the install button and then click the edit button.
Before we delve into the module, let’s first grasp the fundamental role of sitemaps in SEO:
1. Enhanced Indexing:
Sitemaps provide search engines like Google with a roadmap of your website’s structure. This helps search engine bots crawl and index your web pages more efficiently. As a result, your site’s content is more likely to appear in search engine results pages (SERPs).
2. Faster Discovery of New Content:
When you add new pages or products to your online store, a sitemap can alert search engines to these changes promptly. This ensures that your latest content is included in search results sooner rather than later.
3. Improved SEO Performance:
By facilitating better indexing and ensuring that all your web pages are accessible to search engines, sitemaps contribute to improved SEO performance. This can lead to higher rankings, increased organic traffic, and ultimately, more conversions.
Introducing the Google Sitemap Opencart Module
Now that we understand the significance of sitemaps, let’s explore the Google Sitemap Opencart module and how it can elevate your SEO efforts:
1. Automated Sitemap Generation:
This module automates the process of creating and updating your website’s sitemap. You no longer need to manually generate and submit sitemaps to search engines. It handles everything seamlessly.
2. Dynamic Content Inclusion:
The Google Sitemap Opencart module is designed to include all the essential content on your site, such as product pages, categories, information pages, and even manufacturer listings. This comprehensive coverage ensures that search engines index all your relevant content.
3. Priority and Frequency Settings:
You have the flexibility to set priority and update frequency for different types of content. For instance, you can prioritize product pages over informational pages, indicating to search engines the relative importance of each.
4. Multilingual and Multistore Support:
For OpenCart users with multilingual websites or multiple stores, this module offers seamless support. It generates sitemaps for each language or store, making it incredibly versatile.
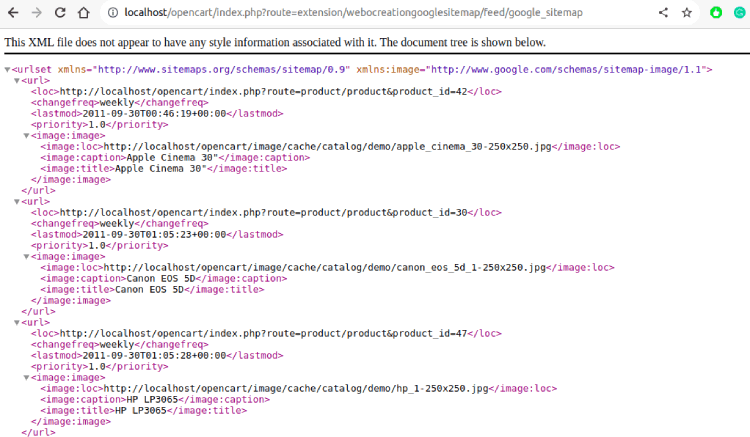
5. Efficient XML Sitemap Creation:
The module generates XML sitemaps, which are the preferred format for search engines. These XML sitemaps are well-structured and adhere to industry standards, ensuring compatibility with various search engines.
6. Improved SEO Performance:
By consistently providing search engines with up-to-date and well-organized sitemaps, you’re enhancing your website’s SEO performance. This can lead to higher search engine rankings and increased visibility among your target audience.
Conclusion
The Google Sitemap Opencart module is a valuable addition to your SEO toolkit, streamlining the management of sitemaps and improving your website’s search engine visibility. By automating sitemap generation and ensuring that search engines are well-informed about your site’s content, you’re giving your online store a significant advantage in the competitive world of e-commerce.
Investing in SEO tools like the Google Sitemap Opencart module not only enhances your site’s performance but also positions your business for sustained growth and success in the digital marketplace. So, take the initiative, install the module, and watch your online store climb the ranks in search engine results.
In this way, you can install and set up the Google Sitemap feed module for Opencart 4. Please let us know if you have any kind of projects, you can email us at webocreation.com@gmail.com. Hope you liked this free opencart module, please subscribe to our YouTube Channel and get more Opencart free extensions. You can also find us on Twitter and Facebook.
In the Opencart tutorial, we are showing you how to use VqMod with examples in Opencart, vqmod installation steps, configurations, example and discuss what kind of issues can occur and its solutions. With this installation, you can use the vqmod XML file to override the core file without changing core files.
Extract the zip that you download, vQmod-oc4-master.zip
You will get vqmod folder and readme file and copy the vqmod directory in your OpenCart root directory, alongside the admin, catalog, extension, system, etc. directories.
If you’ve renamed your admin directory, you’ll have to do this bit manually for now:
Open vqmod/install/index.php and change $admin = ‘admin’; on around line 33 to match your new admin directory name. We have used wpadmin, so that line is $admin=’wpadmin’
Open vqmod/pathReplaces.php and change the line you’d add would be:
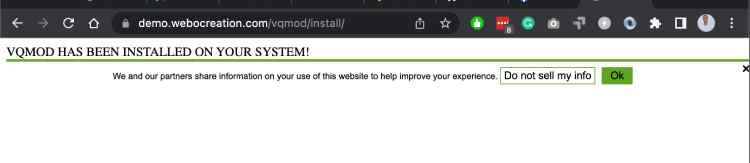
Now, open your website and add /vqmod/install/ at the end of the URL something like https://demo.webocreation.com/vqmod/install/. If everything is correct, you will get messages like:
VQMOD HAS BEEN INSTALLED ON YOUR SYSTEM!
Errors and Solutions:
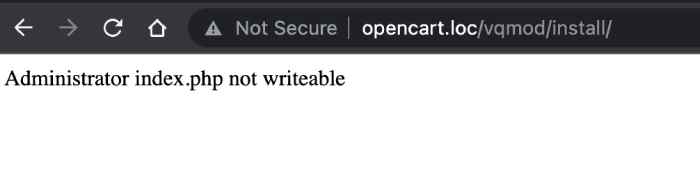
1. Administrator index.php is not writeable
For this issue, first, check and please make sure you replace your admin folder correctly on the vqmod/install/index.php and vqmod/pathReplaces.php, and then you can check the file permission if your server can write on index.php file.
2. ERROR – COULD NOT DETERMINE OPENCART PATH CORRECTLY
For this issue also, we need to make sure you replace your admin folder correctly on the vqmod/install/index.php and vqmod/pathReplaces.php
Example use of Vqmod in Opencart 4
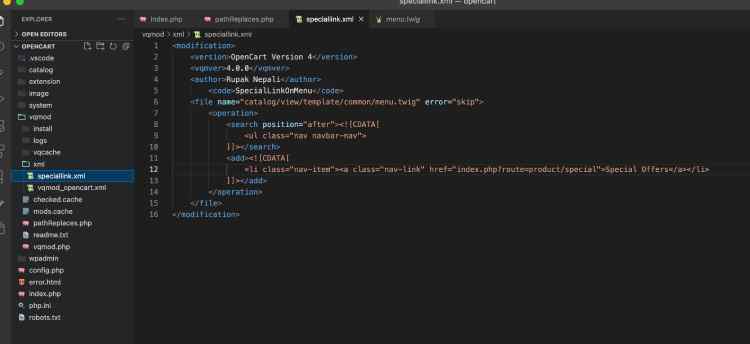
Here is one demo XML file in which you show the “Special Offers” links in the main menu. Open the project in your text editor and go to vqmod folder and then the XML folder create a file named speciallink.xml and add the following lines of code:
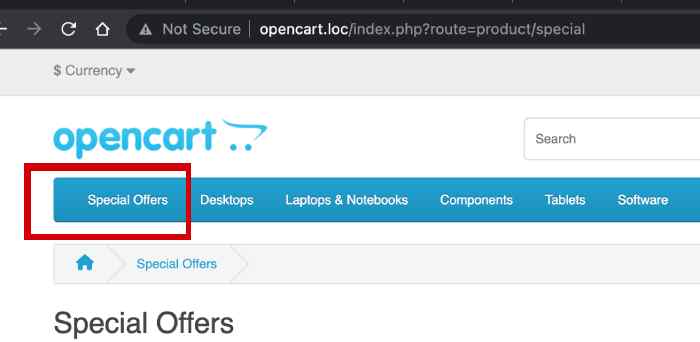
Once, you add the above code and then refresh the frontend URL, then you will see a menu item added at the beginning of the Opencart top menu.
In this way, you can use VqMod, know how to install vqmod, and its configurations, for example, and learn how to fix issues that may occur. Hope you liked this article, please subscribe to our YouTube Channel for Opencart video tutorials. You can also find us on Webocreation Twitter and Webocreation Facebook. Please let us know if you have any questions or concerns.
As part of the Opencart 4 theme development tutorial, We already showed you how to install Opencart 4 theme and to create Opencart 4 custom theme admin section, in today’s tutorial, we are showing you how to develop the frontend section of the Opencart 4 custom theme. You can download the custom Opencart 4 theme here.
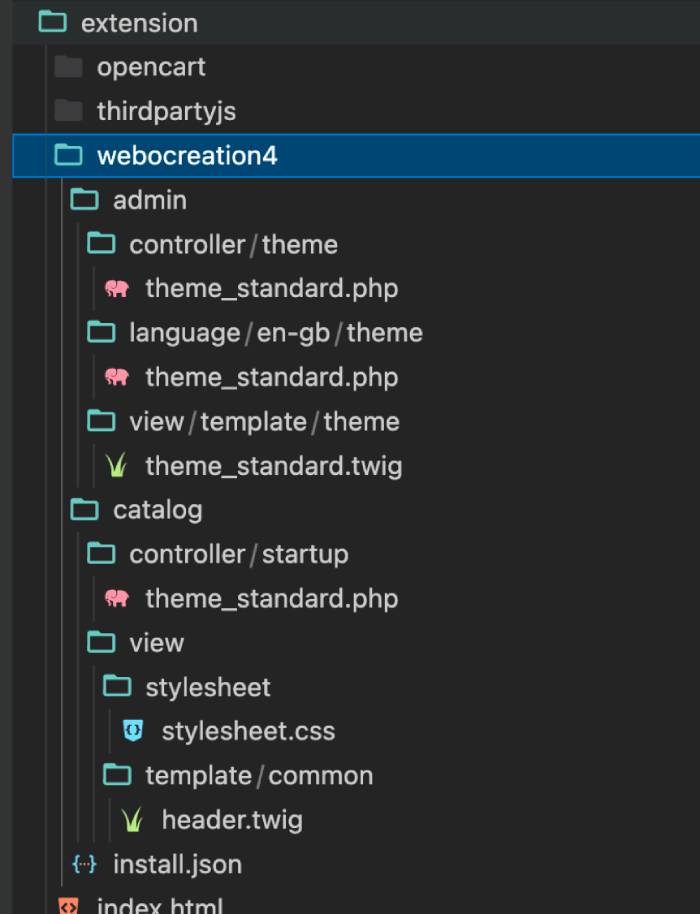
The final files and folders structure of the Opencart 4 custom theme looks like below:
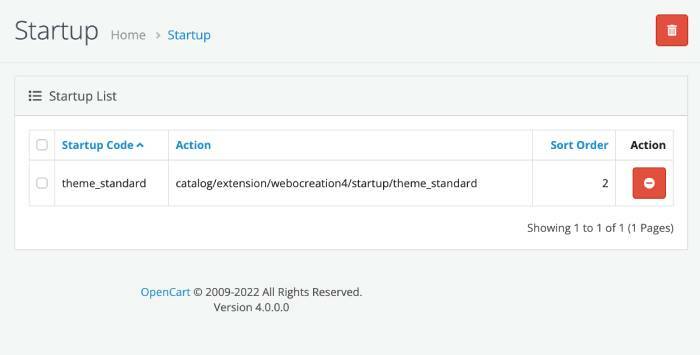
When we developed the backend code, we have added the Startup code like below:
Taking that into consideration, you need to create the following file at extension >> webocreation4 >> catalog >> controller >> startup >> theme_standard.php, once you create the file, you can use the following lines of code.
<?php
namespace Opencart\Catalog\Controller\Extension\webocreation4\Startup;

class ThemeStandard extends \Opencart\System\Engine\Controller
{
    public function index(): void
    {
        if ($this->config->get('theme_theme_standard_status')) {
            $this->event->register('view/*/before', new \Opencart\System\Engine\Action('extension/webocreation4/startup/theme_standard|event'));
        }
    }

    public function event(string &$route, array &$args, mixed &$output): void
    {
        $override = [
            'common/header',
        ];

        if (in_array($route, $override)) {
            $route = 'extension/webocreation4/' . $route;
        }
    }
}
This overrides the header of the code, now, let’s create the header.twig at the extension folder, extension >> webocreation4 >> catalog >> view >> template >> common >> header.twig. Add the following lines of code:
There are events to change the stylesheet but for now, we directly add the code like above. Now let’s create the stylesheet.css, extension >> webocreation4 >> catalog >> view >> stylesheet >>stylesheet.css. Paste the following code:
With these codes, your custom Opencart 4 theme is ready, now you can add your CSS as per your requirement and make the website unique. Once it is active, it looks like the below, you can see the demo of the Opencart 4 custom theme
In this way, we complete a simple OpenCart 4 theme development tutorial, you can develop a new custom Opencart 4 theme and change the style, and show it on the front of Opencart 4. Hope you liked this article, please subscribe to our YouTube Channel for Opencart video tutorials. You can also find us on Webocreation Twitter and Webocreation Facebook. Please let us know if you have any questions or concerns.
Setting up a local PHP development environment with Docker for OpenCart involves creating a Docker Compose configuration file to define the services needed for running OpenCart, such as PHP, MySQL, Redis, Apache, etc. Below is a step-by-step guide to help you set up your development environment:
Install Docker and Docker Compose
Make sure you have Docker and Docker Compose installed on your system. You can download and install them from the official Docker website: https://www.docker.com/get-started
Clone the Opencart Github
Install Git: Before you can clone the OpenCart repository, you need to have Git installed on your system. Git is a version control system that allows you to track changes to files and collaborate with others on software development projects. You can download and install Git from the official website: https://git-scm.com/.
Clone the OpenCart Repository Once Git is installed, open a terminal or command prompt and navigate to the directory where you want to clone the OpenCart repository. Then, run the following command:
This command will clone the entire OpenCart repository from GitHub to your local machine.
Set Up a Local Development Environment
To set up a local development environment for OpenCart, you’ll need a web server (e.g., Apache or Nginx), PHP, and MySQL. You can either install these components manually or use a pre-configured solution like Docker. If you’re using Docker, you can create a docker-compose.yml. This file defines the services needed for running OpenCart, including PHP, MySQL, and Apache.
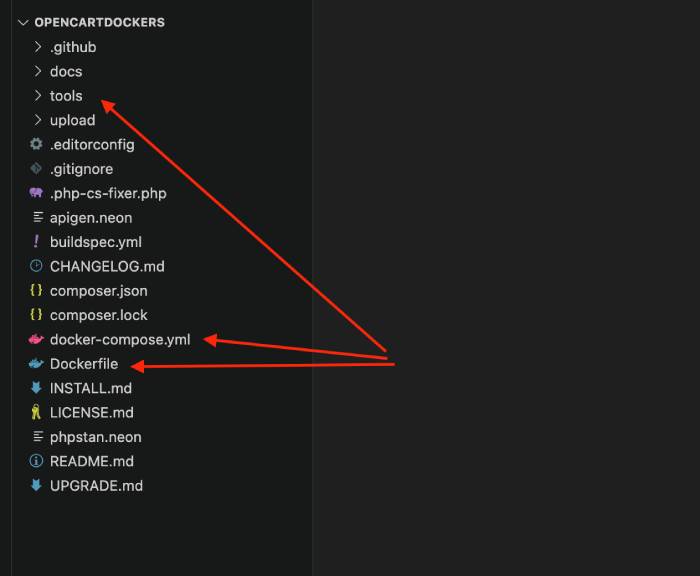
When you clone from the Opencart Github, everything is already set up for you. You will see docker-compose.yml, Dockerfile, and tools folder
Now, run docker-compose up is the command used to start the Docker containers defined in your docker-compose.yml file. This command starts with the services specified in the file, which typically include web servers, databases, and any other necessary components for your application.
docker-compose up
The first time will some time to pull all the Docker images like Postgres, Redis, Memcached, MySQL, Opencart, admirer etc.
Once all docker images are pulled, in the end, you will see the Store link and Admin link below:
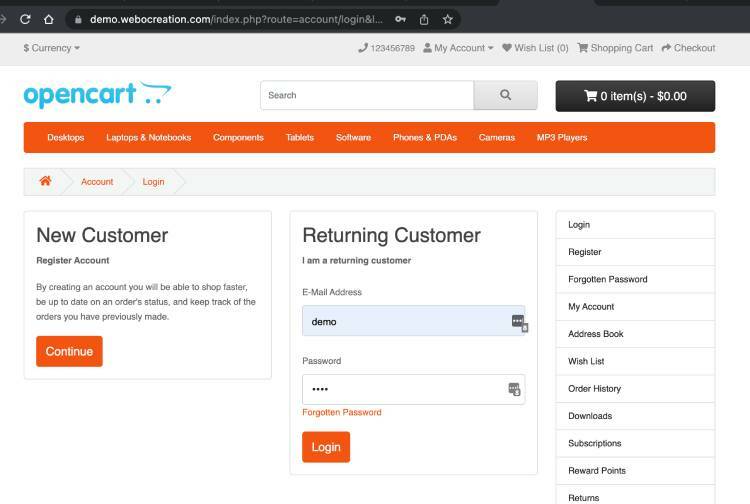
You can visit http://localhost and you will see the Opencart Store. For admin login go to http://localhost/admin and use admin as username and admin as password.
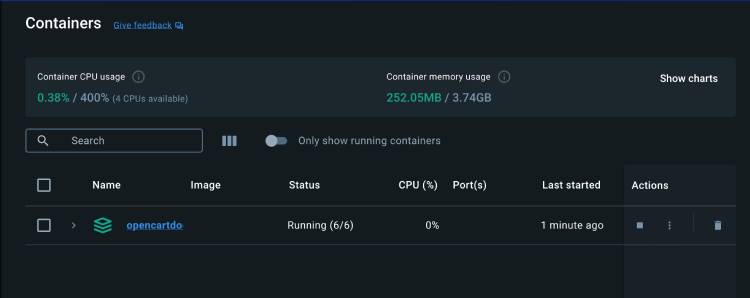
If you check the Docker Desktop, then you will see the following container:
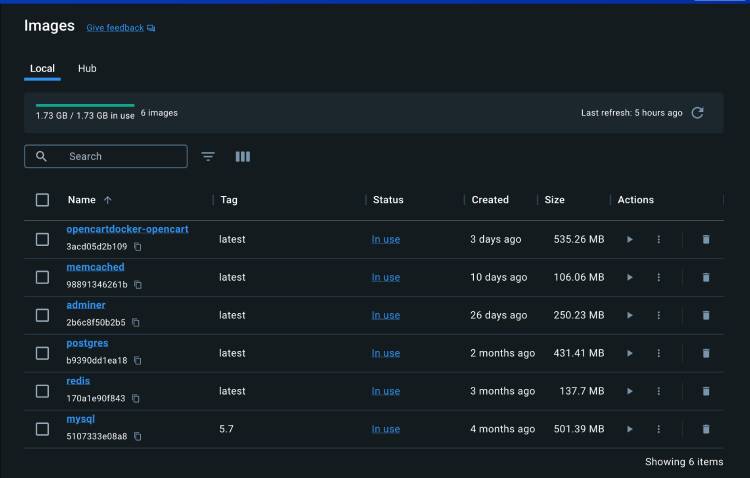
You will see the following Docker Images pulled:
Now you can work in the upload folder code and see changes as you develop in localhost URL.
Access the Opencart database in Docker
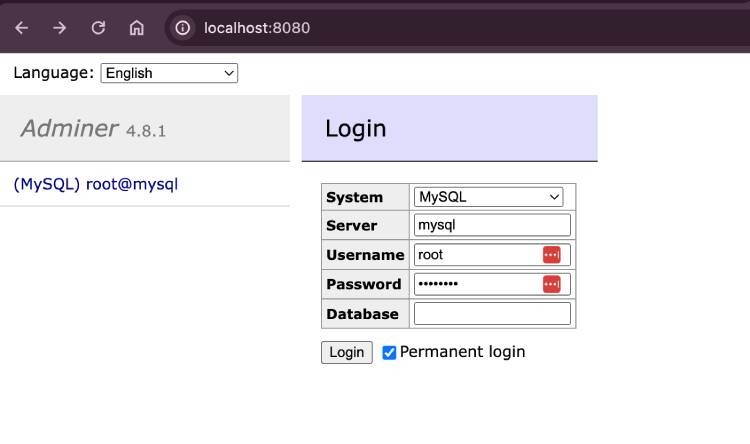
To access the Opencart database visit http://localhost:8080 and enter root as username and password as opencart.
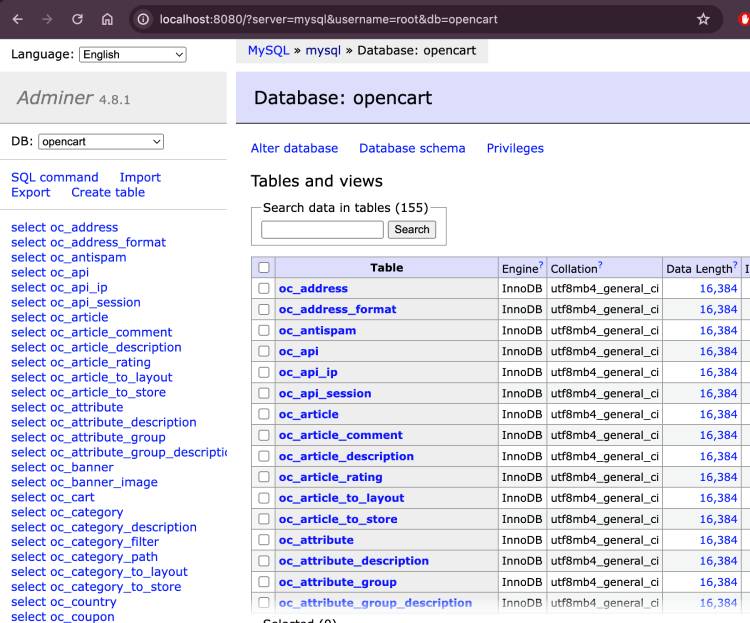
Once you log in you will see the interface similar to PHPmyadmin, select the opencart database and you can see all the database tables
Dockerfile for Opencart
FROM php:8.2.11-apache

ARG DOWNLOAD_URL
ARG FOLDER


ENV DIR_OPENCART='/var/www/html/'
ENV DIR_STORAGE='/storage/'
ENV DIR_CACHE=${DIR_STORAGE}'cache/'
ENV DIR_DOWNLOAD=${DIR_STORAGE}'download/'
ENV DIR_LOGS=${DIR_STORAGE}'logs/'
ENV DIR_SESSION=${DIR_STORAGE}'session/'
ENV DIR_UPLOAD=${DIR_STORAGE}'upload/'
ENV DIR_IMAGE=${DIR_OPENCART}'image/'


RUN apt-get clean && apt-get update && apt-get install unzip

RUN apt-get install -y \
  libfreetype6-dev \
  libjpeg62-turbo-dev \
  libpng-dev \
  libzip-dev \
  && docker-php-ext-configure gd --with-freetype --with-jpeg\
  && docker-php-ext-install -j$(nproc) gd \
  && docker-php-ext-install zip && && docker-php-ext-enable zip\
  && docker-php-ext-enable mysqli

RUN apt-get install -y vim

RUN mkdir /storage && mkdir /opencart

RUN if [ -z "$DOWNLOAD_URL" ]; then \
  curl -Lo /tmp/opencart.zip $(sh -c 'curl -s https://api.github.com/repos/opencart/opencart/releases/latest | grep "browser_download_url" | cut -d : -f 2,3 | tr -d \"'); \
  else \
  curl -Lo /tmp/opencart.zip ${DOWNLOAD_URL}; \
  fi

RUN unzip /tmp/opencart.zip -d  /tmp/opencart;

RUN mv /tmp/opencart/$(if [ -n "$FOLDER" ]; then echo $FOLDER; else  unzip -l /tmp/opencart.zip | awk '{print $4}' | grep -E 'opencart-[a-z0-9.]+/upload/$'; fi)* ${DIR_OPENCART};

RUN rm -rf /tmp/opencart.zip && rm -rf /tmp/opencart && rm -rf ${DIR_OPENCART}install;

RUN mv ${DIR_OPENCART}system/storage/* /storage
COPY configs ${DIR_OPENCART}
COPY php.ini ${PHP_INI_DIR}

RUN a2enmod rewrite

RUN chown -R www-data:www-data ${DIR_STORAGE}
RUN chmod -R 555 ${DIR_OPENCART}
RUN chmod -R 666 ${DIR_STORAGE}
RUN chmod 555 ${DIR_STORAGE}
RUN chmod -R 555 ${DIR_STORAGE}vendor
RUN chmod 755 ${DIR_LOGS}
RUN chmod -R 644 ${DIR_LOGS}*

RUN chown -R www-data:www-data ${DIR_IMAGE}
RUN chmod -R 744 ${DIR_IMAGE}
RUN chmod -R 755 ${DIR_CACHE}

RUN chmod -R 666 ${DIR_DOWNLOAD}
RUN chmod -R 666 ${DIR_SESSION}
RUN chmod -R 666 ${DIR_UPLOAD}

CMD ["apache2-foreground"]
Error: Cannot connect to the Docker daemon at unix:///Users//.docker/run/docker.sock. Is the docker daemon running?
You just need to run the Docker as questioned.
That’s it! You now have a local PHP development environment with Docker for OpenCart. You can develop and test your OpenCart extensions or customizations locally before deploying them to a production environment.
Click the above button to download the Google Base feed module, the file downloaded is webocreationfeeds.ocmod.zip. Now go to the Opencart admin >> Extensions >> Installer >> Then upload the file webocreationfeeds.ocmod.zip
Once it is uploaded and installed. Go to Extensions >> Extensions and filter out to feed.
Click the install button and then click the edit button.
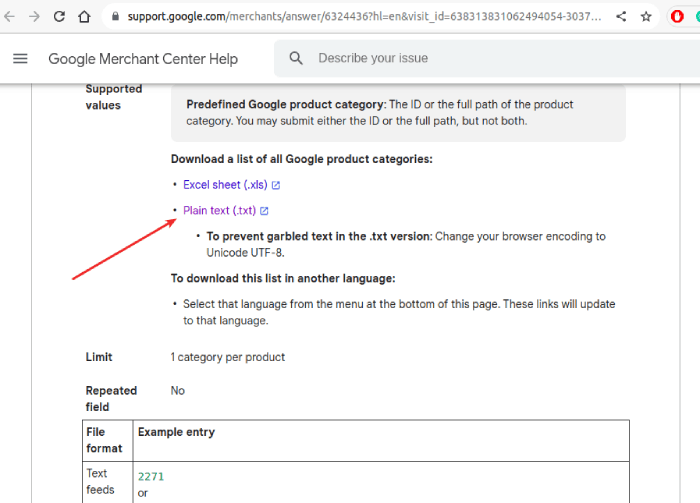
Now click here to download the Google product category text file. You can find it here: https://support.google.com/merchants/answer/6324436?hl=en&visit_id=638313777926954143-2283884251&rd=1
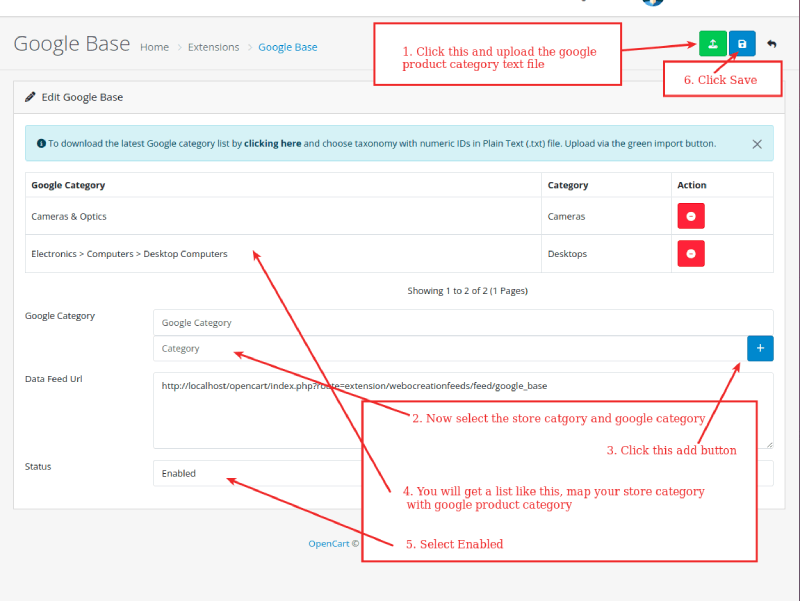
Once you download the text file, and then upload it to the Google Base settings page.
Once the Google category is uploaded, select the store category and Google category and map it out, then click the add button. You will get a list that is mapped to your store category with the Google product category. Then select Enabled and click Save.
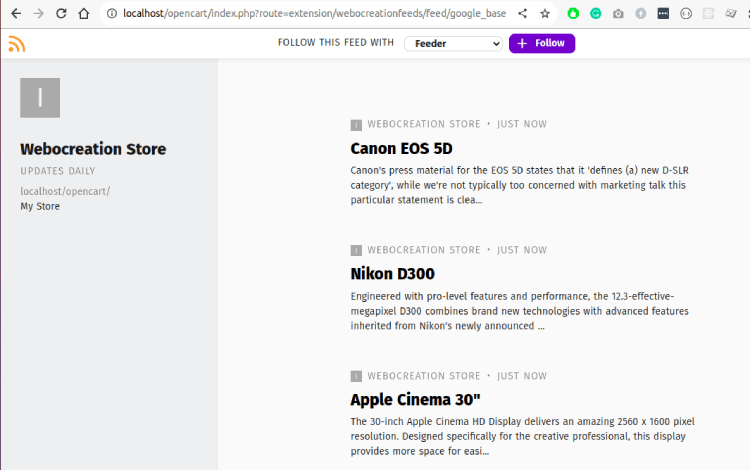
The output of the above with feed reader is like the below:
Then, it will show XML something like below:
<?xml version="1.0" encoding="UTF-8" ?><rss version="2.0" xmlns:g="http://base.google.com/ns/1.0"> <channel> <title>Webocreation Store</title> <description>My Store</description> <link>http://localhost/opencart/</link><item><title><![CDATA[Canon EOS 5D]]></title><link>http://localhost/opencart/index.php?route=product/product&product_id=30</link><description><![CDATA[
Canon's press material for the EOS 5D states that it 'defines (a) new D-SLR category', while we're not typically too concerned with marketing talk this particular statement is clearly pretty accurate. The EOS 5D is unlike any previous digital SLR in that it combines a full-frame (35 mm sized) high resolution sensor (12.8 megapixels) with a relatively compact body (slightly larger than the EOS 20D, although in your hand it feels noticeably 'chunkier'). The EOS 5D is aimed to slot in between the EOS 20D and the EOS-1D professional digital SLR's, an important difference when compared to the latter is that the EOS 5D doesn't have any environmental seals. While Canon don't specifically refer to the EOS 5D as a 'professional' digital SLR it will have obvious appeal to professionals who want a high quality digital SLR in a body lighter than the EOS-1D. It will also no doubt appeal to current EOS 20D owners (although lets hope they've not bought too many EF-S lenses...) äë
]]></description><g:condition>new</g:condition><g:id>30</g:id> <g:image_link>http://localhost/opencart/image/cache/catalog/demo/canon_eos_5d_1-500x500.jpg</g:image_link> <g:model_number>Product 3</g:model_number> <g:identifier_exists>false</g:identifier_exists> <g:price>98</g:price> <g:google_product_category>141</g:google_product_category><g:product_type><![CDATA[Desktops]]></g:product_type><g:product_type><![CDATA[Cameras]]></g:product_type> <g:quantity>7</g:quantity> <g:weight>0.00kg</g:weight> <g:availability><![CDATA[in stock]]></g:availability></item><item><title><![CDATA[Nikon D300]]></title><link>http://localhost/opencart/index.php?route=product/product&product_id=31</link><description><![CDATA[
Engineered with pro-level features and performance, the 12.3-effective-megapixel D300 combines brand new technologies with advanced features inherited from Nikon's newly announced D3 professional digital SLR camera to offer serious photographers remarkable performance combined with agility
]]></description><g:condition>new</g:condition><g:id>31</g:id> <g:image_link>http://localhost/opencart/image/cache/catalog/demo/nikon_d300_1-500x500.jpg</g:image_link> <g:model_number>Product 4</g:model_number> <g:identifier_exists>false</g:identifier_exists> <g:price>98</g:price> <g:google_product_category>141</g:google_product_category><g:product_type><![CDATA[Cameras]]></g:product_type> <g:quantity>1000</g:quantity> <g:weight>0.00kg</g:weight> <g:availability><![CDATA[in stock]]></g:availability></item><item><title><![CDATA[Apple Cinema 30"]]></title><link>http://localhost/opencart/index.php?route=product/product&product_id=42</link><description><![CDATA[
The 30-inch Apple Cinema HD Display delivers an amazing 2560 x 1600 pixel resolution. Designed specifically for the creative professional, this display provides more space for easier access to all the tools and palettes needed to edit, format and composite your work. Combine this display with a Mac Pro, MacBook Pro, or PowerMac G5 and there's no limit to what you can achieve.
]]></description><g:condition>new</g:condition><g:id>42</g:id> <g:image_link>http://localhost/opencart/image/cache/catalog/demo/apple_cinema_30-500x500.jpg</g:image_link> <g:model_number>Product 15</g:model_number> <g:identifier_exists>false</g:identifier_exists> <g:price>110</g:price> <g:google_product_category>325</g:google_product_category><g:product_type><![CDATA[Desktops]]></g:product_type><g:product_type><![CDATA[Components > Monitors]]></g:product_type> <g:quantity>990</g:quantity> <g:weight>12.50kg</g:weight> <g:availability><![CDATA[in stock]]></g:availability></item><item><title><![CDATA[HP LP3065]]></title><link>http://localhost/opencart/index.php?route=product/product&product_id=47</link><description><![CDATA[
Stop your co-workers in their tracks with the stunning new 30-inch diagonal HP LP3065 Flat Panel Monitor. This flagship monitor features best-in-class performance and presentation features on a huge wide-aspect screen while letting you work as comfortably as possible - you might even forget you're at the office
]]></description><g:condition>new</g:condition><g:id>47</g:id> <g:image_link>http://localhost/opencart/image/cache/catalog/demo/hp_1-500x500.jpg</g:image_link> <g:model_number>Product 21</g:model_number> <g:identifier_exists>false</g:identifier_exists> <g:price>122</g:price> <g:google_product_category>325</g:google_product_category><g:product_type><![CDATA[Laptops & Notebooks]]></g:product_type><g:product_type><![CDATA[Desktops]]></g:product_type> <g:quantity>1000</g:quantity> <g:weight>1.00kg</g:weight> <g:availability><![CDATA[in stock]]></g:availability></item><item><title><![CDATA[HTC Touch HD]]></title><link>http://localhost/opencart/index.php?route=product/product&product_id=28</link><description><![CDATA[
HTC Touch - in High Definition. Watch music videos and streaming content in awe-inspiring high definition clarity for a mobile experience you never thought possible. Seductively sleek, the HTC Touch HD provides the next generation of mobile functionality, all at a simple touch. Fully integrated with Windows Mobile Professional 6.1, ultrafast 3.5G, GPS, 5MP camera, plus lots more - all delivered on a breathtakingly crisp 3.8" WVGA touchscreen - you can take control of your mobile world with the HTC Touch HD.
]]></description><g:condition>new</g:condition><g:id>28</g:id> <g:image_link>http://localhost/opencart/image/cache/catalog/demo/htc_touch_hd_1-500x500.jpg</g:image_link> <g:model_number>Product 1</g:model_number> <g:identifier_exists>false</g:identifier_exists> <g:price>122</g:price> <g:google_product_category>325</g:google_product_category><g:product_type><![CDATA[Desktops]]></g:product_type><g:product_type><![CDATA[Phones & PDAs]]></g:product_type> <g:quantity>939</g:quantity> <g:weight>146.40g</g:weight> <g:availability><![CDATA[in stock]]></g:availability></item><item><title><![CDATA[iPhone]]></title><link>http://localhost/opencart/index.php?route=product/product&product_id=40</link><description><![CDATA[
iPhone is a revolutionary new mobile phone that allows you to make a call by simply tapping a name or number in your address book, a favorites list, or a call log. It also automatically syncs all your contacts from a PC, Mac, or Internet service. And it lets you select and listen to voicemail messages in whatever order you want just like email.
]]></description><g:condition>new</g:condition><g:id>40</g:id> <g:image_link>http://localhost/opencart/image/cache/catalog/demo/iphone_1-500x500.jpg</g:image_link> <g:model_number>product 11</g:model_number> <g:identifier_exists>false</g:identifier_exists> <g:price>123.2</g:price> <g:google_product_category>325</g:google_product_category><g:product_type><![CDATA[Desktops]]></g:product_type><g:product_type><![CDATA[Phones & PDAs]]></g:product_type> <g:quantity>970</g:quantity> <g:weight>10.00kg</g:weight> <g:availability><![CDATA[in stock]]></g:availability></item><item><title><![CDATA[iPod Classic]]></title><link>http://localhost/opencart/index.php?route=product/product&product_id=48</link><description><![CDATA[
More room to move.
With 80GB or 160GB of storage and up to 40 hours of battery life, the new iPod classic lets you enjoy up to 40,000 songs or up to 200 hours of video or any combination wherever you go.
]]></description><g:condition>new</g:condition><g:id>48</g:id> <g:image_link>http://localhost/opencart/image/cache/catalog/demo/ipod_classic_1-500x500.jpg</g:image_link> <g:model_number>product 20</g:model_number> <g:identifier_exists>false</g:identifier_exists> <g:price>122</g:price> <g:google_product_category>325</g:google_product_category><g:product_type><![CDATA[Desktops]]></g:product_type><g:product_type><![CDATA[MP3 Players]]></g:product_type> <g:quantity>995</g:quantity> <g:weight>1.00kg</g:weight> <g:availability><![CDATA[in stock]]></g:availability></item><item><title><![CDATA[MacBook]]></title><link>http://localhost/opencart/index.php?route=product/product&product_id=43</link><description><![CDATA[
MacBook makes it easy to hit the road thanks to its tough polycarbonate case, built-in wireless technologies, and innovative MagSafe Power Adapter that releases automatically if someone accidentally trips on the cord.
]]></description><g:condition>new</g:condition><g:id>43</g:id> <g:image_link>http://localhost/opencart/image/cache/catalog/demo/macbook_1-500x500.jpg</g:image_link> <g:model_number>Product 16</g:model_number> <g:identifier_exists>false</g:identifier_exists> <g:price>602</g:price> <g:google_product_category>325</g:google_product_category><g:product_type><![CDATA[Laptops & Notebooks]]></g:product_type><g:product_type><![CDATA[Desktops]]></g:product_type> <g:quantity>929</g:quantity> <g:weight>0.00kg</g:weight> <g:availability><![CDATA[in stock]]></g:availability></item><item><title><![CDATA[MacBook Air]]></title><link>http://localhost/opencart/index.php?route=product/product&product_id=44</link><description><![CDATA[
MacBook Air is ultrathin, ultraportable, and ultra unlike anything else. But you don’t lose inches and pounds overnight. It’s the result of rethinking conventions. Of multiple wireless innovations. And of breakthrough design. With MacBook Air, mobile computing suddenly has a new standard.
]]></description><g:condition>new</g:condition><g:id>44</g:id> <g:image_link>http://localhost/opencart/image/cache/catalog/demo/macbook_air_1-500x500.jpg</g:image_link> <g:model_number>Product 17</g:model_number> <g:identifier_exists>false</g:identifier_exists> <g:price>1202</g:price> <g:google_product_category>325</g:google_product_category><g:product_type><![CDATA[Laptops & Notebooks]]></g:product_type><g:product_type><![CDATA[Desktops]]></g:product_type> <g:quantity>1000</g:quantity> <g:weight>0.00kg</g:weight> <g:availability><![CDATA[in stock]]></g:availability></item><item><title><![CDATA[Palm Treo Pro]]></title><link>http://localhost/opencart/index.php?route=product/product&product_id=29</link><description><![CDATA[
Redefine your workday with the Palm Treo Pro smartphone. Perfectly balanced, you can respond to business and personal email, stay on top of appointments and contacts, and use Wi-Fi or GPS when you’re out and about. Then watch a video on YouTube, catch up with news and sports on the web, or listen to a few songs. Balance your work and play the way you like it, with the Palm Treo Pro.
]]></description><g:condition>new</g:condition><g:id>29</g:id> <g:image_link>http://localhost/opencart/image/cache/catalog/demo/palm_treo_pro_1-500x500.jpg</g:image_link> <g:model_number>Product 2</g:model_number> <g:identifier_exists>false</g:identifier_exists> <g:price>337.99</g:price> <g:google_product_category>325</g:google_product_category><g:product_type><![CDATA[Desktops]]></g:product_type><g:product_type><![CDATA[Phones & PDAs]]></g:product_type> <g:quantity>999</g:quantity> <g:weight>133.00g</g:weight> <g:availability><![CDATA[in stock]]></g:availability></item><item><title><![CDATA[Product 8]]></title><link>http://localhost/opencart/index.php?route=product/product&product_id=35</link><description><![CDATA[
Product 8
]]></description><g:condition>new</g:condition><g:id>35</g:id> <g:image_link></g:image_link> <g:model_number>Product 8</g:model_number> <g:identifier_exists>false</g:identifier_exists> <g:price>122</g:price> <g:google_product_category>325</g:google_product_category><g:product_type><![CDATA[Desktops]]></g:product_type> <g:quantity>1000</g:quantity> <g:weight>5.00kg</g:weight> <g:availability><![CDATA[in stock]]></g:availability></item><item><title><![CDATA[Samsung SyncMaster 941BW]]></title><link>http://localhost/opencart/index.php?route=product/product&product_id=33</link><description><![CDATA[
Imagine the advantages of going big without slowing down. The big 19" 941BW monitor combines wide aspect ratio with fast pixel response time, for bigger images, more room to work and crisp motion. In addition, the exclusive MagicBright 2, MagicColor and MagicTune technologies help deliver the ideal image in every situation, while sleek, narrow bezels and adjustable stands deliver style just the way you want it. With the Samsung 941BW widescreen analog/digital LCD monitor, it's not hard to imagine.
]]></description><g:condition>new</g:condition><g:id>33</g:id> <g:image_link>http://localhost/opencart/image/cache/catalog/demo/samsung_syncmaster_941bw-500x500.jpg</g:image_link> <g:model_number>Product 6</g:model_number> <g:identifier_exists>false</g:identifier_exists> <g:price>242</g:price> <g:google_product_category>325</g:google_product_category><g:product_type><![CDATA[Desktops]]></g:product_type><g:product_type><![CDATA[Components > Monitors]]></g:product_type> <g:quantity>1000</g:quantity> <g:weight>5.00kg</g:weight> <g:availability><![CDATA[in stock]]></g:availability></item><item><title><![CDATA[Sony VAIO]]></title><link>http://localhost/opencart/index.php?route=product/product&product_id=46</link><description><![CDATA[
Unprecedented power. The next generation of processing technology has arrived. Built into the newest VAIO notebooks lies Intel's latest, most powerful innovation yet: Intel® Centrino® 2 processor technology. Boasting incredible speed, expanded wireless connectivity, enhanced multimedia support and greater energy efficiency, all the high-performance essentials are seamlessly combined into a single chip.
]]></description><g:condition>new</g:condition><g:id>46</g:id> <g:image_link>http://localhost/opencart/image/cache/catalog/demo/sony_vaio_1-500x500.jpg</g:image_link> <g:model_number>Product 19</g:model_number> <g:identifier_exists>false</g:identifier_exists> <g:price>1202</g:price> <g:google_product_category>325</g:google_product_category><g:product_type><![CDATA[Laptops & Notebooks]]></g:product_type><g:product_type><![CDATA[Desktops]]></g:product_type> <g:quantity>1000</g:quantity> <g:weight>0.00kg</g:weight> <g:availability><![CDATA[in stock]]></g:availability></item> </channel></rss>
In this way, you can install and set up the Google base feed module for Opencart 4. Please let us know if you have any kind of projects, you can email us at webocreation.com@gmail.com. Hope you liked this free opencart module, please subscribe to our YouTube Channel and get more Opencart free extensions. You can also find us on Twitter and Facebook.
Creating a website with a pleasant user experience is essential for any business. With the right UI UX design services, you can ensure that your users have a positive experience when they visit your site and are more likely to return in the future. But how to optimize the user experience on your website? In this article, we’ll discuss some best practices for creating effective UX/UI design that helps ensure your website visitors have an enjoyable time. We’ll also look at examples of websites that have successfully applied these strategies and give you tips on how you can use them to create an attractive and intuitive interface.
Table of Contents
Fundamentals of UX/UI design to improve user experience
How to increase user retention and conversion
2.1 How UX/UI design can increase conversion on your website
2.2 How UX/UI design can improve your visitor retention
Tools and techniques for effective UX/UI design
UX/UI design that connects with your users
Fundamentals of UX/UI design to improve user experience
When it comes to the fundamentals of UX/UI design, there are several key aspects that need to be taken into account to improve the user experience on your website.
First of all, it is essential to understand and know your target audience to adjust your website design to their needs and preferences. You should consider aspects such as the age, gender, interests, and education level of your audience to create an attractive and user-friendly design.
Another important aspect is the navigation of your website. The information must be organized in a clear and intuitive way to guide the user effectively. Usability is a key factor in the user experience, and the UX/UI design must be thought about this. Buttons and links should be easily identifiable and the design should not distract the user from their main objective on the page.
Additionally, the loading speed of your website is a critical aspect that can significantly affect the user experience. If your website takes too long to load, visitors may abandon it and look for an alternative. Therefore, it is important to ensure that your website is optimized to be fast and efficient.
Another aspect to consider is accessibility. The UX/UI design must be suitable for users with visual or hearing disabilities and ensure that all content is readable and available in different formats.
Lastly, the UX/UI design must also be visually appealing. Colors, fonts, and styles should be cohesive and aligned with the company brand. A carefully planned and consistent design can build trust and credibility in your website.
How to increase user retention and conversion
UX/UI design is essential to increase user retention and conversion on your website. While it is important to offer a pleasant experience to visitors, it is also crucial that the site’s functionalities are designed so that users can carry out their actions without difficulty.
An effective UX/UI design helps guide users toward desired actions and avoid confusion that can lead to frustration and ultimately abandonment. This may be the result of poorly thought-out design or poor organization of information.
On the other hand, a well-planned and executed UX/UI design can make it easier for users to find what they are looking for and complete the actions they want. This increases visitor satisfaction and therefore the likelihood that they will return in the future.
Additionally, UX/UI design also has an impact on user conversion. If the design is well-adjusted to users and their needs, conversion rates can increase significantly. This is because users become more comfortable with navigation and find what they are looking for more easily.
How UX/UI design can increase conversion on your website
UI UX design services are not only about creating a visually appealing website but also about offering a satisfying user experience that increases conversion on your website. By optimizing the design elements that influence user decisions, you can get more visitors to take desired actions on your site, such as registering, making a purchase, or filling out a form.
To achieve a UX/UI design that increases conversion, several key elements need to be taken into account. First, the design must be consistent and easy to use at all stages of the user interaction process. From the moment the user arrives on the website until they take the desired action, the design should guide them intuitively and without interruptions.
Additionally, it is important to make relevant information easily accessible and prominent in the design. This may include information about special offers, pricing, product reviews or customer testimonials. By ensuring that important information is in the right places and easy to find, you can increase user confidence and reduce the chances of them leaving your site in frustration.
Another important aspect of UX/UI design that can affect conversion is website loading speed. Users expect websites to load quickly, and if yours is slow or has loading issues, users will likely leave before they can take a desired action. Be sure to optimize images, videos, and other elements that may slow down the site’s loading, and use speed analysis tools to keep the site as fast as possible.
Finally, usability is vital for the conversion of your website. Users need to be able to easily navigate your site and find what they are looking for without confusion. If there are too many clicks or complicated steps to perform an action, users are more likely to abandon the process. Make sure your design is simple and easy to understand, without redundant or unnecessary elements.
How UX/UI design can improve your visitor retention
Do you want to keep your users engaged with your website and ensure they visit again? UX/UI design can be a fundamental tool to achieve this. User experience is crucial to keep the user coming back to your website. By using proper UX/UI design, you can improve your visitor retention and ensure that your site becomes a destination that users want to return to.
UX/UI design plays an important role in user retention. By offering an engaging and satisfying user experience, you can ensure that users are more willing to return to your site. A positive user experience translates into a better perception of your brand and greater loyalty from your users.
One of the ways you can improve user retention is by offering a consistent, user-friendly design at all stages of the process of interacting with your site. This means that from the user’s arrival to their departure, the design must guide them intuitively and without interruptions. Additionally, it is important to highlight relevant information in the design, such as special offers, prices, product reviews or customer testimonials.
It’s also important to make sure your website loads quickly. Users don’t want to wait to access the content they want, and if your site takes a while to load, they’re likely to leave before interacting with it. Be sure to optimize images, videos, and other elements that may slow down the site’s loading, and use speed analysis tools to keep the site as fast as possible.
Another aspect to consider is the simplicity of the design. Users need to be able to easily navigate your site and find what they are looking for without confusion. If there are too many clicks or complicated steps to perform an action, users are more likely to abandon the process. Make sure your design is simple and easy to understand, without redundant or unnecessary elements.
Tools and techniques for effective UX/UI design
Implementing an effective UX/UI design on your website may seem like a daunting task, but there are several tools and techniques that can help you achieve it.
First, creating wireframes is a useful technique for planning the structure and navigation of your website. You can use tools like Balsamiq or Axure to quickly create wireframes and visualize the different sections and elements of your site.
Another tool is the use of heat maps and user tracking tools like Hotjar or Crazy Egg. These tools allow you to understand how users interact with your website and discover elements that may be causing confusion or making it difficult for users to meet their goals.
On the other hand, it is important to pay attention to visual details in UX/UI design. Typography and colors can have a big impact on user perception and experience. Tools like Google Fonts or Adobe Color can help you select the most appropriate fonts and colors for your website.
Additionally, conducting usability tests with real users can provide valuable insights into how they can improve the user experience. Tools like UserTesting or TryMyUI can be useful for performing usability tests and getting feedback on your website.
In terms of techniques, the use of information architecture is essential to organize and present information in a clear and coherent manner. Creating a visual hierarchy and grouping related content can help users understand how different website elements are related.
Finally, it is important to keep in mind that UX/UI design is not a static task, but should be iterative and evolutionary. Constantly testing and analyzing user behavior can help you identify areas for improvement on your website and continually optimize the user experience.
UX/UI design that connects with your users
The success of a website depends largely on its UX/UI design since this is the element that connects directly with users. A well-thought-out and executed UX/UI design can positively influence visitor satisfaction, their experience, and their stay on the site.
To create an effective UX/UI design for your website, it is essential to know and understand your users. You should know what their needs, preferences, and behaviors are when browsing online. Only then can you create a design that is easy to use, attractive, and with the right information in the right place.
Wireframing is a technique used by many UX/UI designers to plan the structure and organization of information on a website. Thanks to them, the different sections, elements, and functions that will make up the site can be displayed graphically. This allows you to make informed decisions before starting the creation of the website.
Another tool used to achieve effective UX/UI design is the use of heat maps and user tracking tools. These tools allow you to visualize and analyze user behavior when browsing your website, which will help you improve problem areas. You can also see where users are clicking, what areas are not getting enough attention, and what content needs to be improved.
It’s important to pay attention to visual details in UX/UI design, such as typography and colors. These elements can influence users’ mood, their ability to understand information, and their overall perception of the website. Appropriate fonts and colors must be identified and used according to the type of content and the target audience of the website.
Conducting usability tests with real users is a crucial technique to achieve a UI UX design service that connects with your users. These tests can provide you with valuable insights into users’ needs and preferences, and how they interact with your website in their daily lives. Additionally, these tests allow you to make design improvements before launching the website.
In this hosting tutorial, we are looking into the AWS Lightsail LAMP stack, where we will host Opencart in AWS, and found out that there is no easy way to install it like WordPress or Magento even in AWS Lightsail, hope the Opencart package will be added soon, but for now, we need to use LAMP stack to host the Opencart in the AWS Lightsail. AWS Lightsail LAMP stack includes the latest versions of PHP 7+, Apache, and MySQL with phpMyAdmin and pre-configured components and PHP modules include FastCGI, ModSecurity, SQLite, Varnish, ImageMagick, xDebug, Xcache, OpenLDAP, Memcache, OAuth, PEAR, PECL, APC, GD, and cURL. All of the PHP modules and components needed for Opencart hosting are available in the LAMP stack of AWS Lightsail.
Let’s get started with AWS LightSail
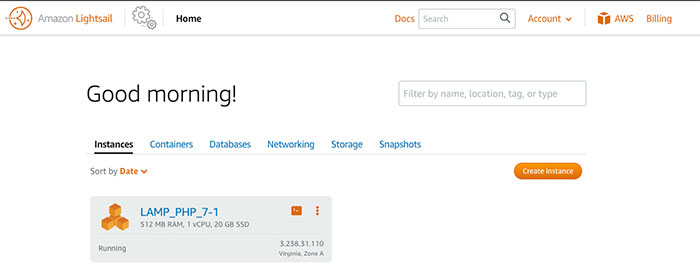
Go to https://aws.amazon.com/lightsail, and create an account or log in to your AWS account. The main AWS Lightsail dashboard page is separate from the main AWS dashboard. Or you can navigate from All services >> Compute >> Lightsail. It may look similar to the below screenshot.
Create a LAMP Instance for Opencart hosting
In the Lightsail dashboard click the “Create Instance” button. You will see a page where you can select instance details:
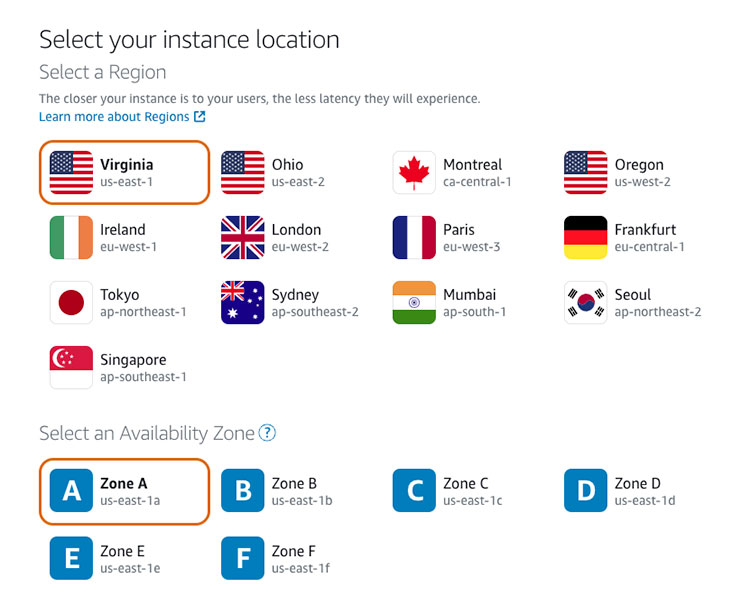
Instance Location and Availability Zone: The location is auto-selected as per your geo-location but you can change it as per your hosting need. Mostly we used Virginia, Zone A (us-east-1) as our website visitors are mostly from the USA, it is upon your requirement and decides which location and Availability zone to choose.
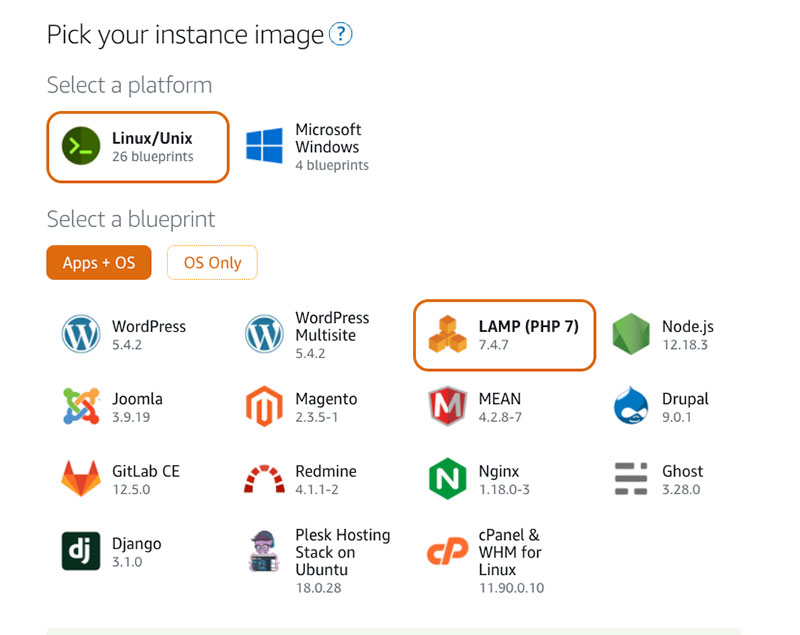
Platform instance image and Stack blueprint: We need linux/unix for the Opencart hosting so in “Select a platform” select the Linux/Unix. Then, in “Select a blueprint” select the LAMP (PHP 7)
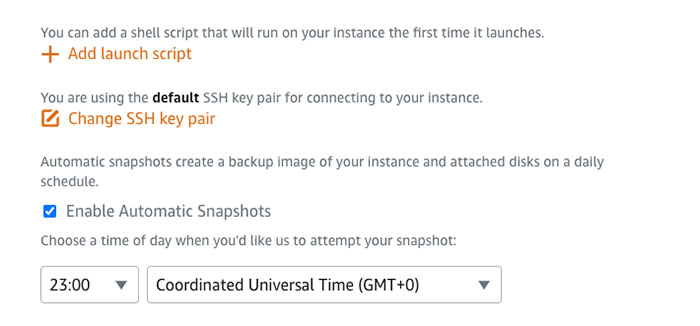
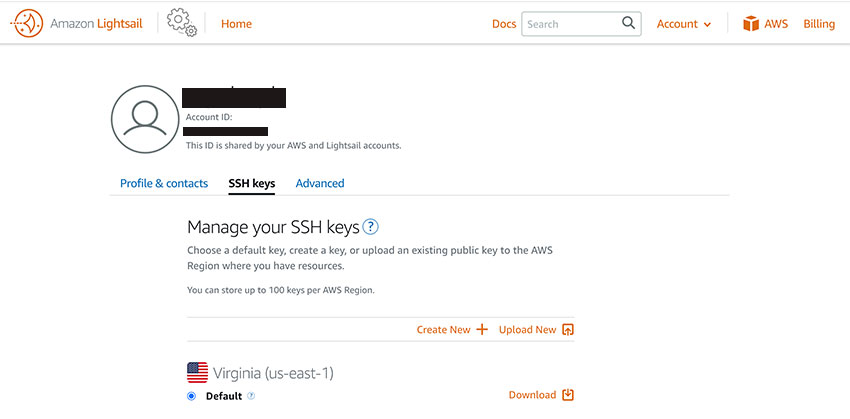
SSH key pair and Automatic snapshots: Now go more below and you will see “Add launch script”, for now, we are not adding any script there. We will run scripts one by one in a command shell. If your account is new then create an SSH key pair else by default the key is selected. If you want to create something new then you can change it by clicking “Change SSH key pair”. Then check the checkbox for “Enable Automatic Snapshots” as this acts as a backup for you. If you don’t need backup then no need to check it. After you enable it, select the time you want to create the snapshot. We select 23:00 Coordinated Universal Time.
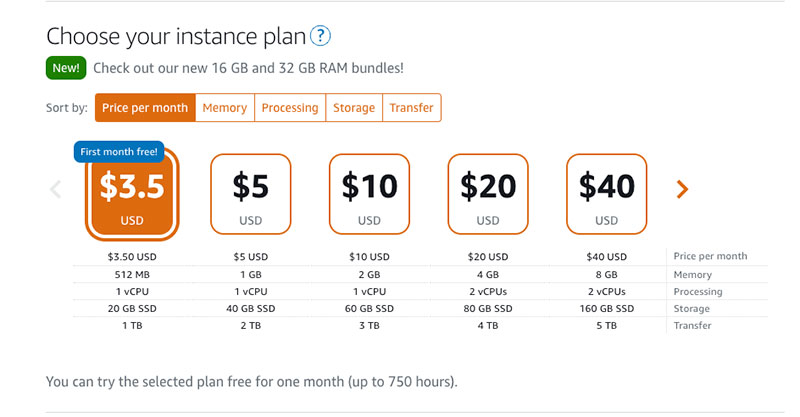
Choose your instance plan: For a start, for Linux/Unix-based instances, we can try the $3.50 USD Lightsail plan free for one month (up to 750 hours). Later, if we need to scale then we will scale by creating a new instance from the snapshots.
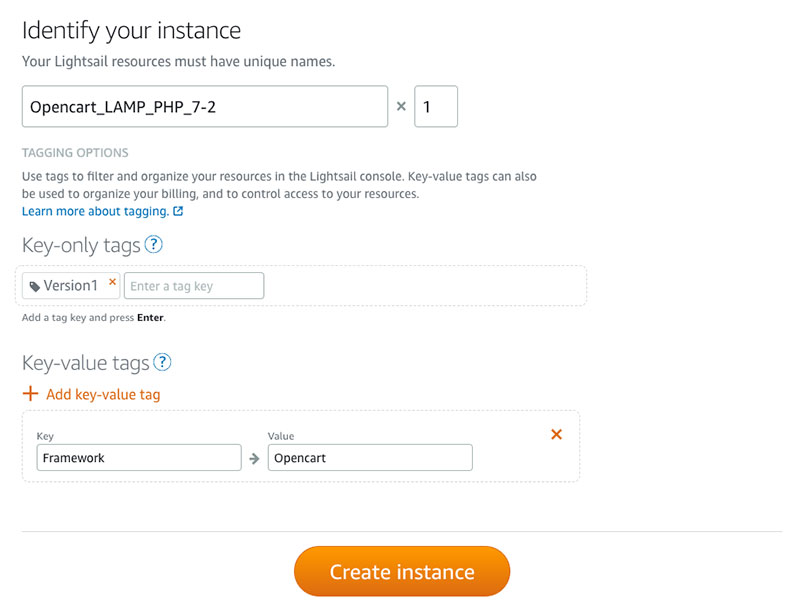
Identify your instance for Opencart: Now in the identify your instance, we entered the name as “Opencart_LAMP_PHP_7-2”, Key-only tags as Version1, and Key-value tags with Key as Framework and Value as Opencart. You can enter as per your need to identify your instance.
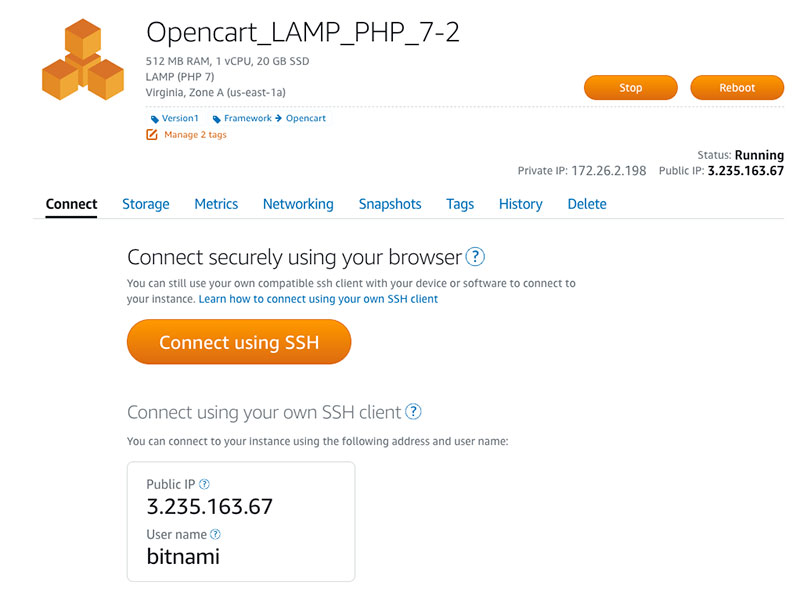
Now finally click the Create Instance button. It will take around 1 min to spin up your virtual machine with a LAMP stack. Then, you will see an instance in your dashboard like below:
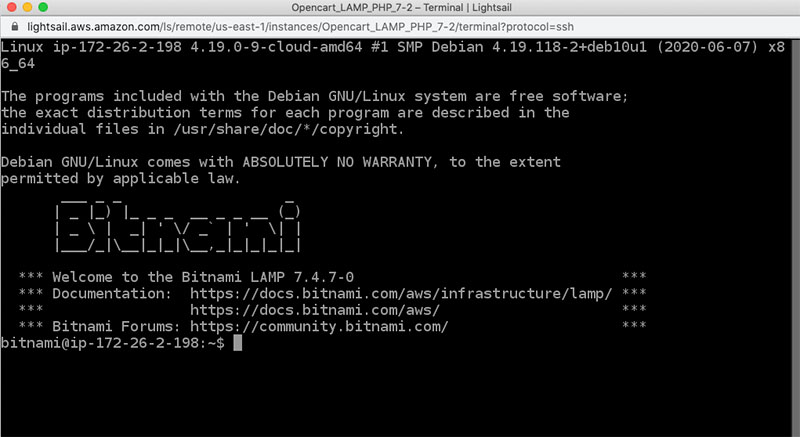
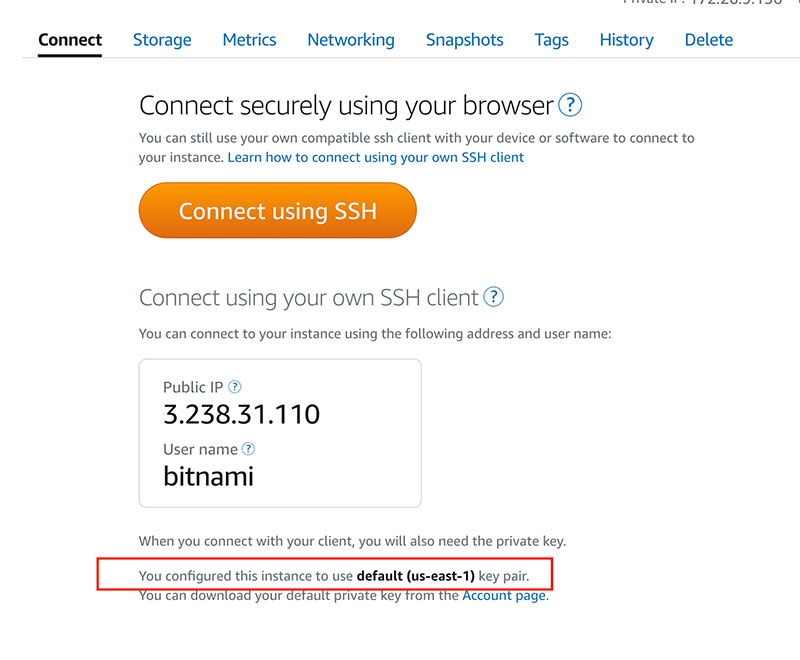
Now, click on it and you will get the details of that instance. You can see the buttons to stop and reboot. You can see the “Connect using SSH” button, Public IP and Username.
Click on the “Connect using SSH”, and you will see the command interface where you can enter your commands.
Update system and PHP version in AWS lightsail
To ensure your system is up-to-date, you can run the following command:
sudo apt update -y
Check your PHP version by the following command as Opencart needs PHP version 7.3. If your PHP version is less the 7.3 than you need to upgrade to PHP 7.3+
php -v
If you are using the latest LAMP stack in AWS Lightsail then it is greater than PHP 7.4.
Opencart installation steps in the AWS Lightsail LAMP stack
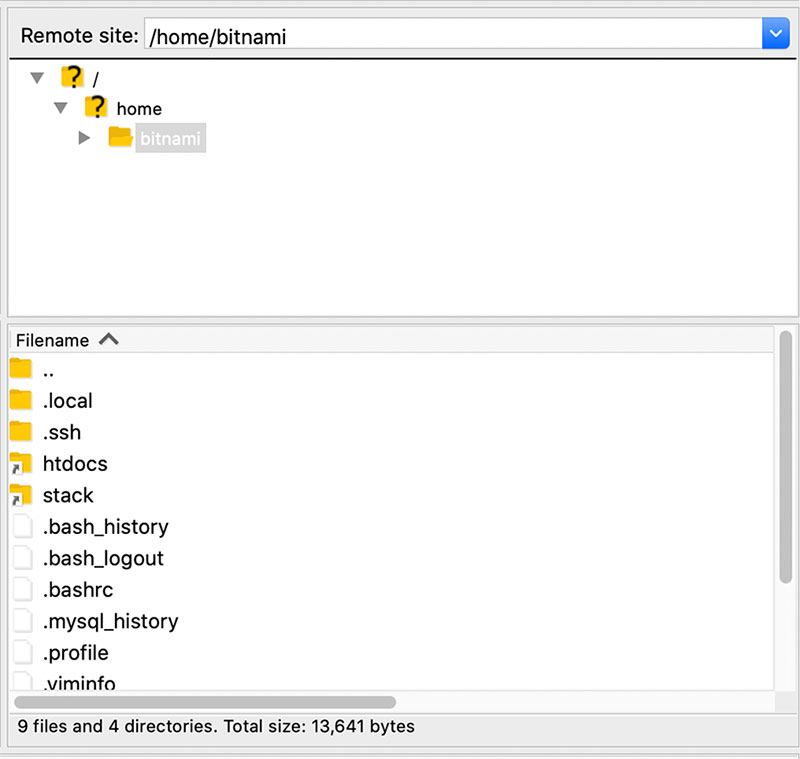
Change the directory to /opt/bitnami/apache2/htdocs
cd /opt/bitnami/apache2/htdocs
When you do the ls command then you will see index.html which shows the Bitnami page. So, let’s remove it by the following command:
sudo rm index.html
Now, let’s retrieve the Opencart zip code by using wget. You can get the zip URL from the Github Opencart releases. We are using the zip link of Opencart 3.0.3.6 as this is the latest version of Opencart now.
Let’s unzip the opencart-3.0.3.6.zip to backup/ folder
unzip opencart-3.0.3.6.zip -d ./backup
Now, move all the files and folder at backup/upload as these are the Opencart files
mv ./backup/upload/* .
Now, if you visit your Public IP, which is 3.235.163.67, then you will get a similar error to error no 1. So, let’s change the ownership of the files and folders to the daemon: daemon by running the following command:
If you want to be sure of files and folders permissions then you can run the following two commands as well:
sudo find . -type d -exec chmod 0755 {} \;
sudo find . -type f -exec chmod 0644 {} \;
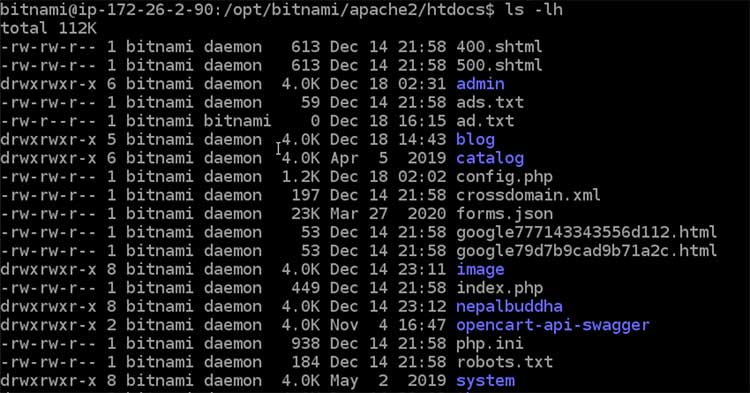
Now, see files and folders permission in AWS Lightsail for Opencart by running the command ls-lh
ls -lh
You will see the output below:
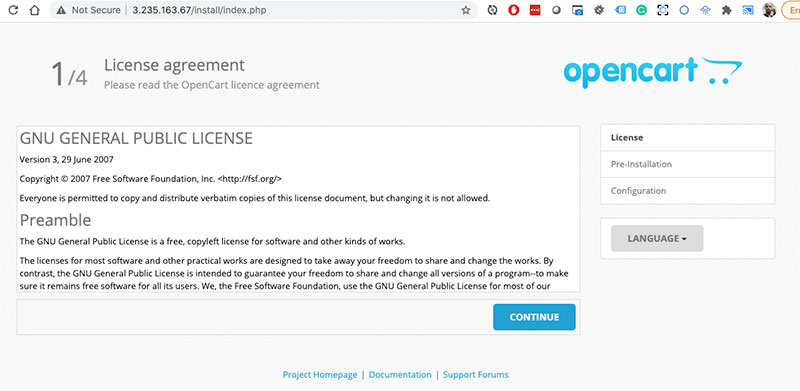
Now, if you go to public IP, then you will be able to see the first page of the Opencart installation.
Create Static IP
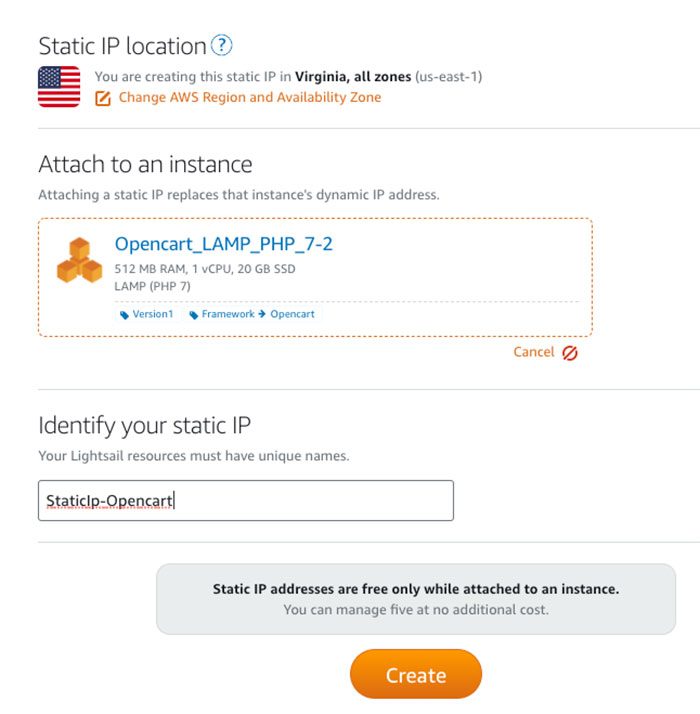
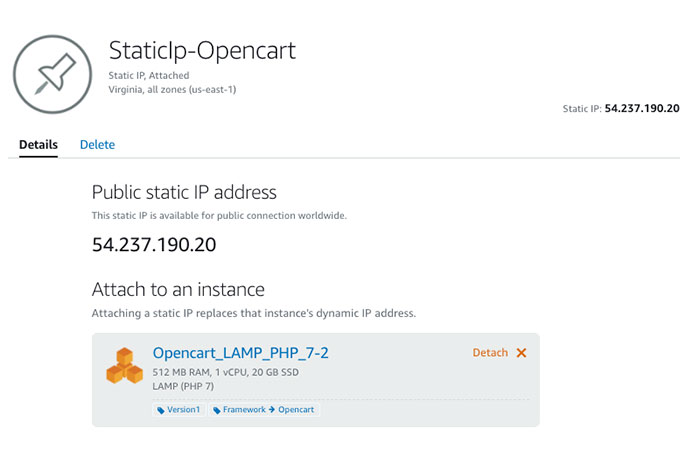
You can start the installation but it is better to set up static IP. For that, go to the instance detail page, and in the “Networking” tab in the IP addresses section, click the button “Create static IP“.
A static IP is a fixed, public IP address that you can assign and reassign to your instances. In the Static IP location, you left it default. In the Attach to an instance, select your instance, we select “Opencart_LAMP_PHP_7-2”. In the Identify your static IP, just give a unique name.
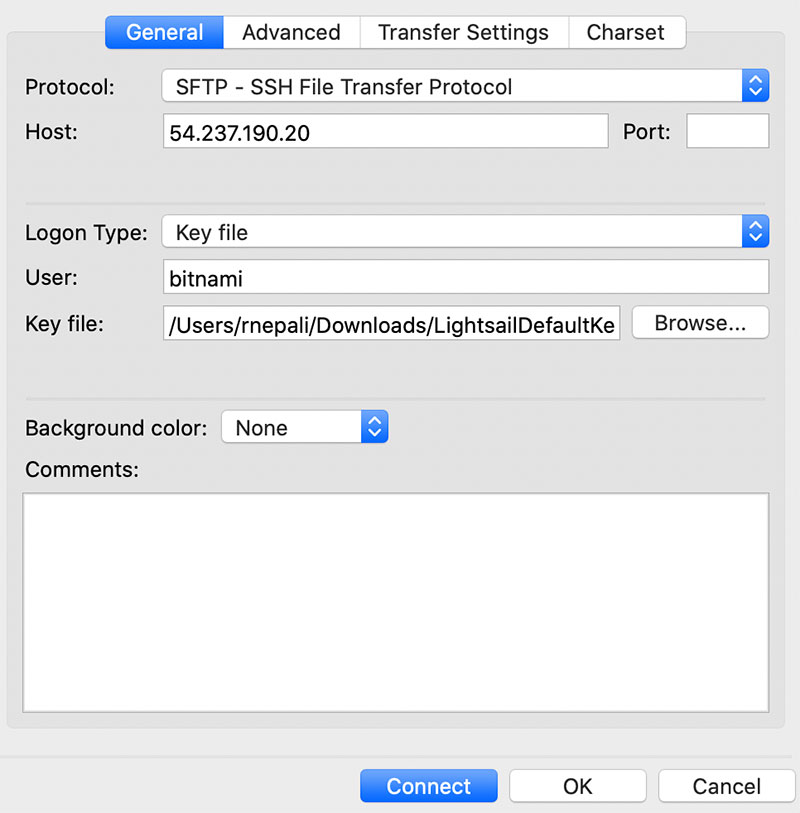
Now, your public IP as shown on the page, is 54.237.190.20. Now open the IP in the browser then you will see step 1 of the Opencart installation page.
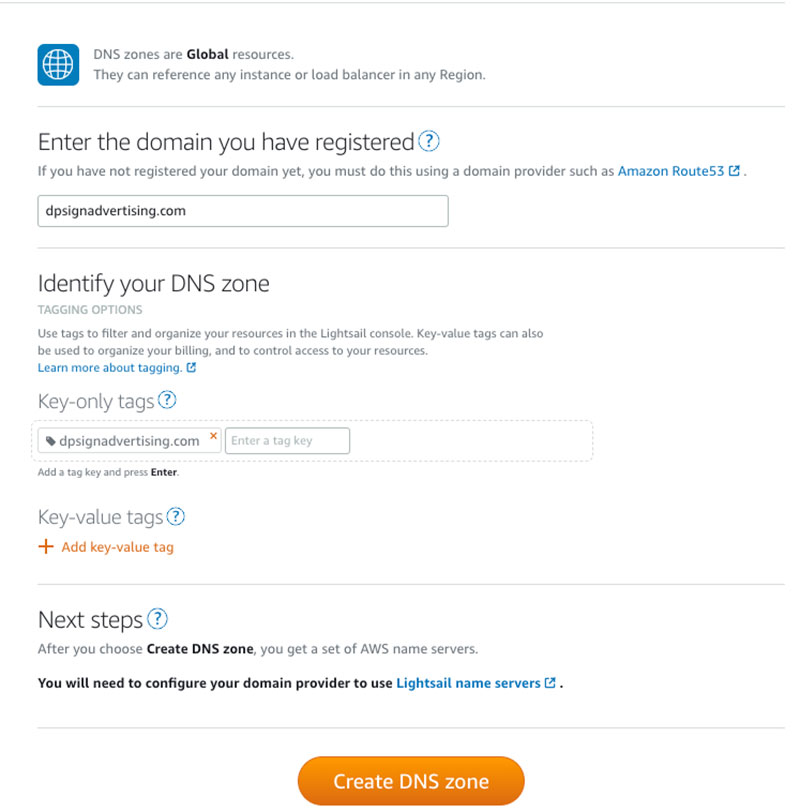
Create DNS Zone
As we are using an external domain registrar than Route 53 of AWS, so we need to create the DNS zone so we can add the NS1 and NS2 in the domain. Go to the Lightsail dashboard and go to the “Networking” tab. As we already set up Static IP, you will see a button to create a DNS zone, click the button “Create DNS zone”. Enter the domain you have registered, which is dpsignadvertising.com, enter the key-only tags and key-value tags as per your requirements else leave it blank.
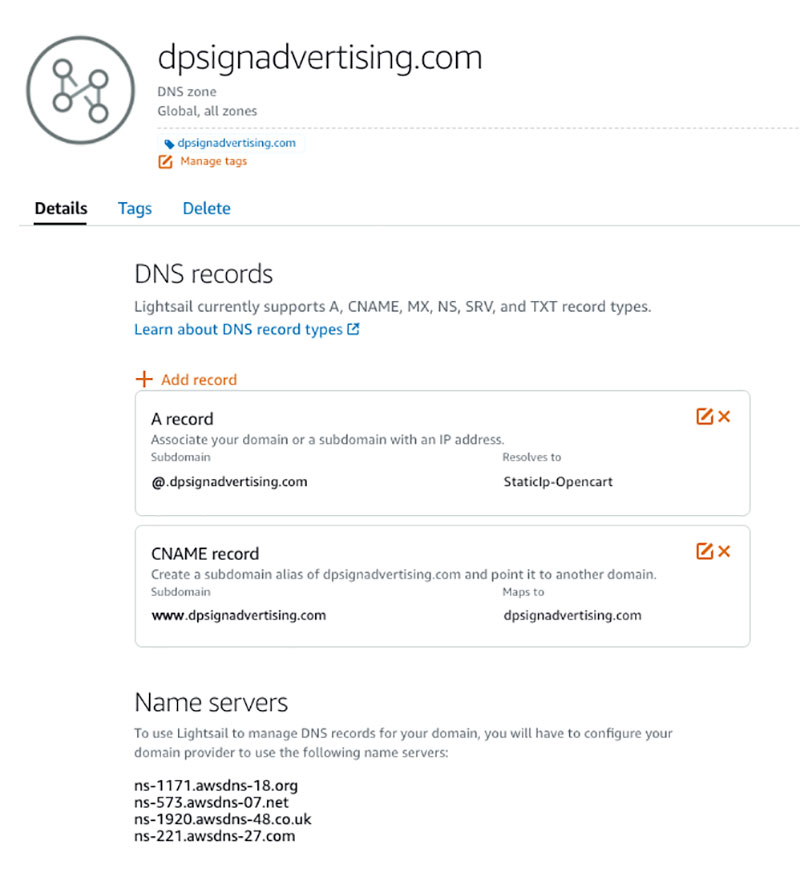
Once you submit the “Create DNS zone” then you will get the Name Servers like the below:
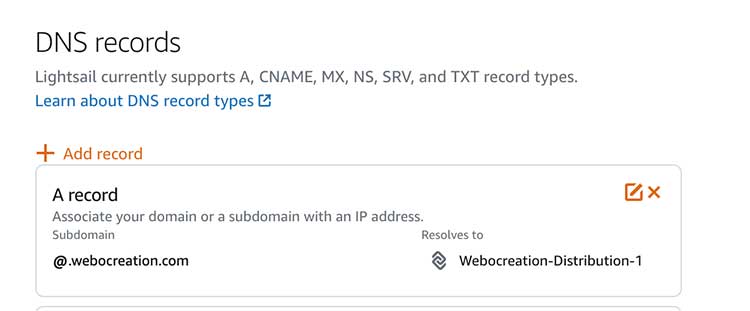
Click “Add record”, then select A record, and enter @ in the subdomain in “Resolves to” select Static IP, our is “StaticIp-Opencart”, then click the green tick box. Similarly, again, click “Add record”, then select CNAME record, and enter www in the subdomain and in “Maps to” enter the domain name. URL, then click the green tick box.
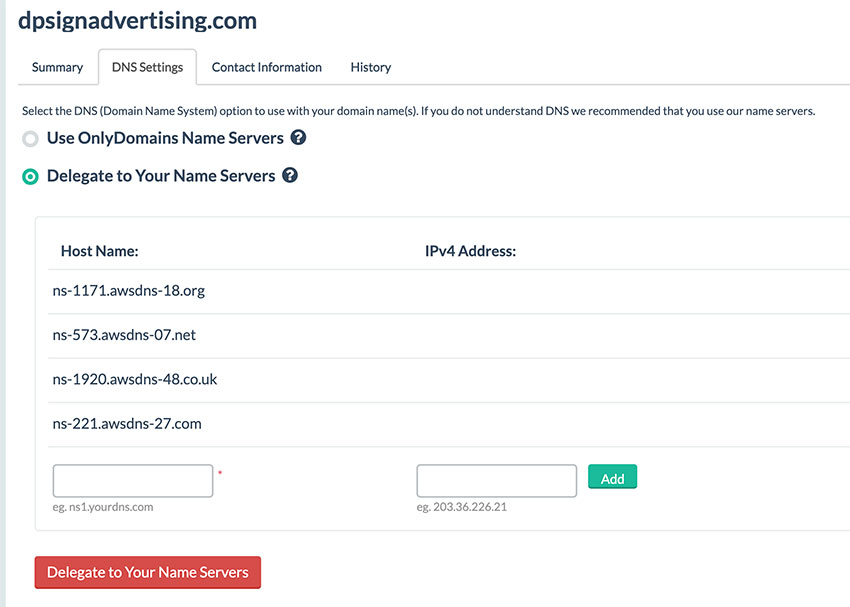
Add Name servers to your domain registrar
Now open your domain registrar, our is onlydomains.com, in your domain change the Name Servers details like below and delegate to your AWS nameservers.
After some time go to your domain, for us, it took around 5min for DNS propagation, as we use dpsignadvertising.com for the domain so when we visit the dpsignadvertising.com, visit your URL and you will see the first page of the Opencart installation of the License agreement, click the “Continue” button.
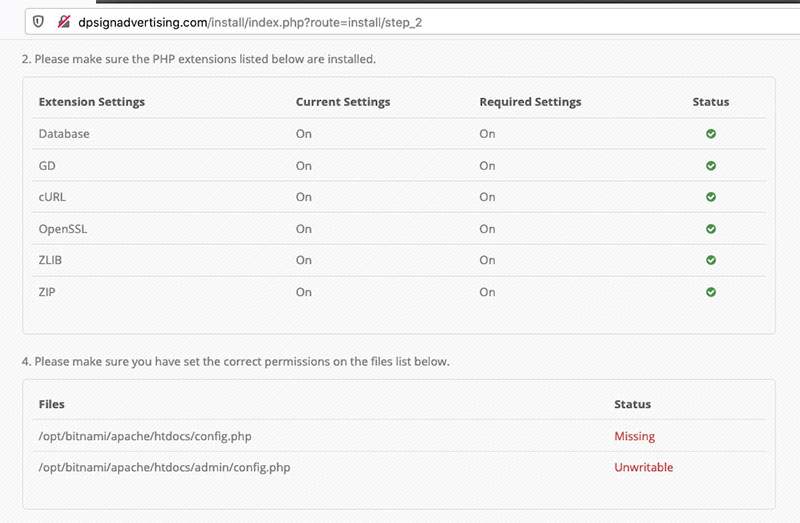
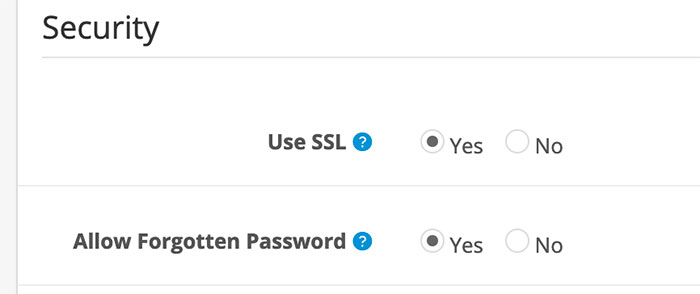
In step 2, pre-installation steps, we see all green except the config files:
So, we need to create the config.php files. You can use the following commands to change the config-dist.php to config.php
After the changes above, you can refresh the 2nd step of installation and click “Continue”. We reached the third step, where we need to enter the database and administration details.
Create a database, database user, and grant access
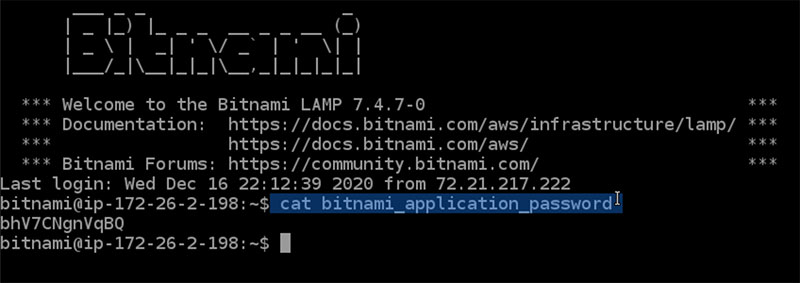
Let’s close your opened console command terminal and reconnect by clicking the “Connect using SSH” button so that you can open the new console command terminal. Then, run the command to get the root password.
cat bitnami_application_password
The root password for us is bhV7CNgnVqBQ
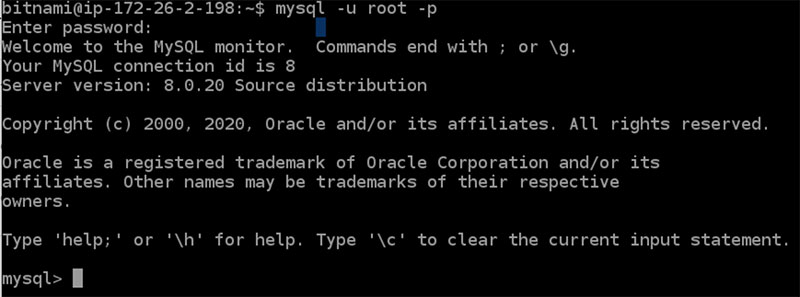
Now, let’s run the following command to create the new database
mysql -u root -p
Then enter the above password. Then you entered it into the MySQL console.
Let’s create a database, we are naming it “webocreationdb_2021”
CREATE DATABASE webocreationdb_2021;
Let’s create user “webocreationu12” with password ‘webocreation#123#dppass’ by running the command below:
CREATE USER 'webocreationu12'@'localhost' IDENTIFIED BY 'webocreation#123#dppass';
Let’s grant access to all for the user “webocreationu12” by running the command below:
GRANT ALL PRIVILEGES ON * . * TO 'webocreationu12'@'localhost';
Now, you can exit the database by typing the command exit;.
exit;
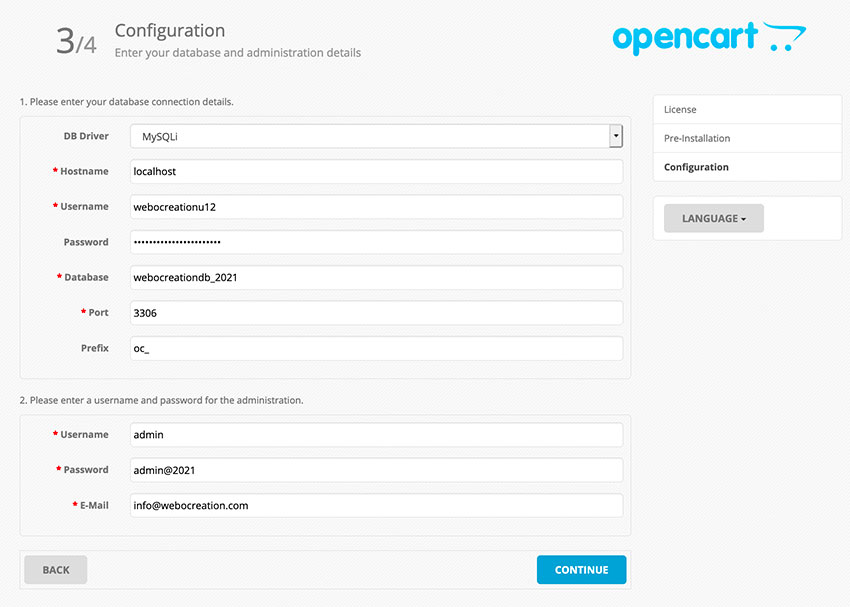
With all these, we are set for our database configuration.
DB Driver: Select MySQLi
Hostname: localhost
Username: webocreationu12
Password: webocreation#123#dppass
Database: webocreationdb_2021
Port: 3306
Prefix: oc_ or any as you need.
You can enter the username and password for the administration
Username: admin (any)
Password: admin@2021 (any)
E-mail: info@webocreation.com (any)
Once, you entered all the details then click “Continue”.
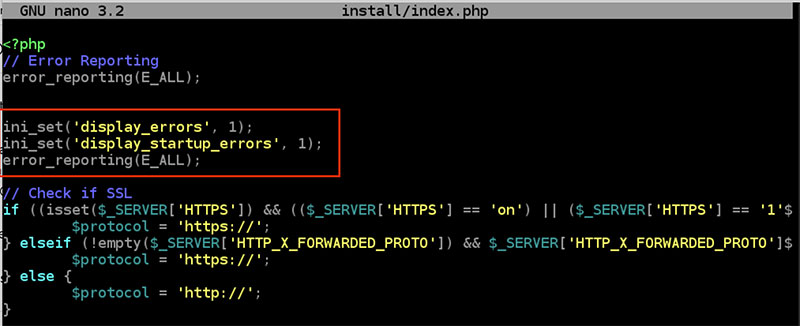
In this 3rd step, you may see the blank page. So let’s debug the error. For that, let’s run the following command:
cd /opt/bitnami/apache2/htdocs/
sudo nano install/index.php
Then, in install/index.php, add the following lines of code.
After adding the code, exit the nano by clicking Ctrl + O and then Ctrl + X. After this let’s refresh step 3 http://dpsignadvertising.com/install/index.php?route=install/step_3, then you will see error 2. Let’s fix error 2.
sudo nano install/cli_install.php
Then find the code $db->query(“SET @@session.sql_mode = ‘MYSQL40′”); and change to following:
$db->query("SET @@session.sql_mode = ''");
After the change, click Ctrl+O and Ctrl+X to exit the nano.
Similarly, do the same for install/model/install/install.php
sudo nano install/model/install/install.php
Then find the code $db->query(“SET @@session.sql_mode = ‘MYSQL40′”); and change to following:
$db->query("SET @@session.sql_mode = ''");
After the change, click Ctrl+O and Ctrl+X to exit the nano.
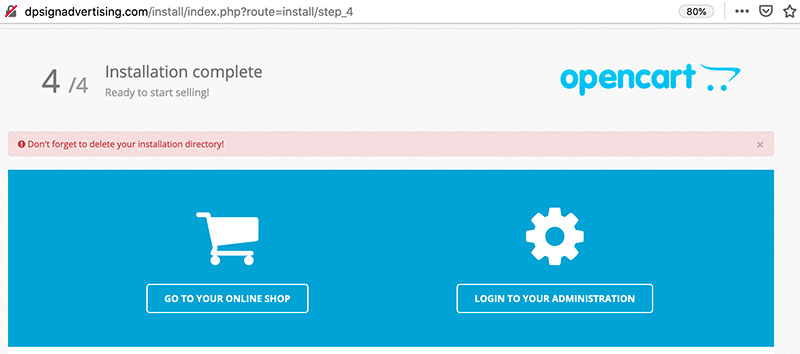
Now, go and refresh the URL http://dpsignadvertising.com/install/index.php?route=install/step_3 and your Opencart installation is completed.
Now, let’s delete the install folder and other files and folders which are not needed.
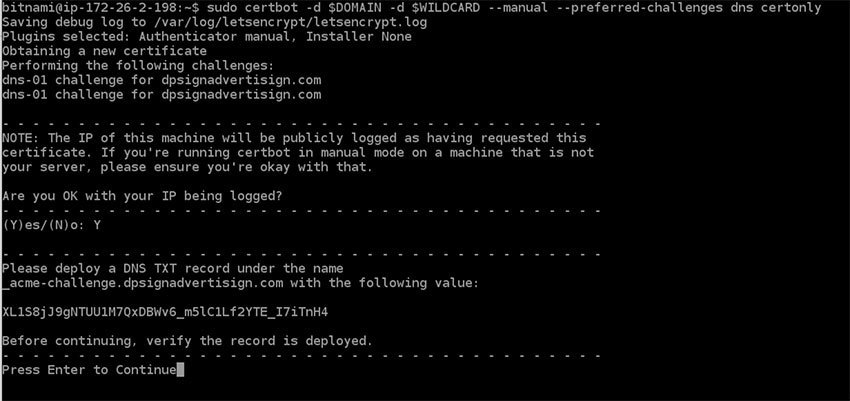
Request a Let’s Encrypt SSL wildcard certificate by running the following commands, don’t forget to replace your domain where we use dpsignadvertising.com
Before entering the Continue, you need to add the TXT record in the “Add record”. So, go to Lightsail dashboard >> Networking tab >> Click the DNS Zones for dpsignadvertising.com >> Click to Add record >> Select the TXT record >> in the Subdomain adds _acme-challenge >> in the “Responds with” add the value shown in console, ours is “XL1S8jJ9gNTUU1M7QxDBWv6_m5lC1Lf2YTE_I7iTnH4” and save it by clicking the green checkmark.
Please wait for some time so that it propagates, after around 10 mins we click Continue in the Console.
Sometimes, it asks to add multiple TXT records. This must be set up in addition to the previous challenges; do not remove, replace, or undo the previous challenge tasks yet. Note that you might be asked to create multiple distinct TXT records with the same name. This is permitted by DNS standards.
Create links to the Let’s Encrypt certificate files in the Apache server directory by running the following commands:
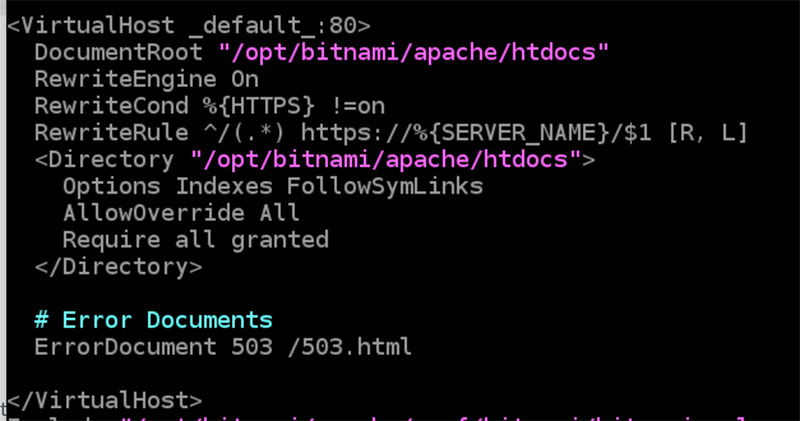
Configure HTTP to HTTPS redirection for your web application by running the following commands:
sudo vim /opt/bitnami/apache2/conf/bitnami/bitnami.conf
Add the following lines of code:
RewriteEngine On
RewriteCond %{HTTPS} !=on
RewriteRule ^/(.*) https://%{SERVER_NAME}/$1 [R,L]
After adding the code click the ESC key, and then enter:wq to save your changes, and quit Vim. Then restart the LAMP stack
sudo /opt/bitnami/ctlscript.sh restart
With these changes your SSL certificate is ready. Now you need to change a setting in Opencart admin and change the URL in the config.php and admin/config.php
cd /opt/bitnami/apache2/htdocs
sudo nano config.php
Change the define(‘HTTPS_SERVER’, ‘http://dpsignadvertising.com/’); to add https://
Exit it by pressing Ctrl + O to save and then enter, after that Ctrl + X to exit.
Now go to https://dpsignadvertising.com/admin and System >> Settings >> Edit the store >> go to the Server tab >> in the security section select Yes for “Use SSL”. Then click Save.
With these steps, your SSL is activated for your domain.
Rename .htaccess.txt to .htaccess
Pull the .htaccess.txt of the Opencart and rename it to .htaccess
Once the .htaccess.txt is renamed to .htaccess, then we can activate the SEO URL at the admin. Go to admin >> System >> Settings >> Edit the Store >> Server tab >> Select Yes for “Use SEO URL”.
Read more for some best practices of Opencart SEO.
How to set up FileZilla SFTP in AWS Lightsail to transfer files?
In the Protocol field, you need to select SFTP – SSH File Transfer Protocol. The Host is your public IP. In Logon Type, you need to select the Key file. In the User field, you need to type bitnami. Finally in the Key file field, add the public key (where can you find the public key).
Then, click Connect button. You will get a list of folders, your code will be at htdocs.
PHPMyadmin access
Download the Lightsail SSH public key and change its permission to 0644 and make a tunnel to connect to PHPmyadmin. First, run the following command. Change the path of the key as per yours.
Then, go to http://127.0.0.1:8888/phpmyadmin/ and you will be able to log in to the PHPMyadmin. The username is the root and you can get the password by running the following command the first time you logged in:
Where can you find the SSH public key in AWS Lightsail?
To get your SSH public key in AWS Lightsail, go to the top menu “Account“, then click on the SSH Keys tab, where you can see the lists of keys as per your region. Download the key as per your region. (How to find the region key pair of your EC2 instance?)
How to find the region key pair of your EC2 instance?
Click on the instance and go to Connect tab, then at the bottom, it shows which key pair is used for this instance.
You configured this instance to use default (us-east-1) key pair.
How to upgrade to a higher Lightsail package?
To upgrade your Lightsail plan to a larger instance, take a snapshot and then create a larger instance from the snapshot.
Setup CDN Content Distribution in AWS
Go to Lightsail dashboard >> Networking tab >> Click the “Create distribution” button >> Then, in Choose your origin, select your Instance
You can “Best for Dynamic Content” or Custom settings. Change the default cache behavior to cache nothing, then change the “Directory and file overrides” and give a path to the image cache.
In the Custom domains, first, create the SSL certificates and then enable the custom domains.
You can leave the remaining setting as it is or change it as per your requirement and click the “Create Distribution” button and your CDN is set up.
Then, change A record with the AWS Cloudfront URL by removing the Static IP.
To check if the Cloudfront is working or not, just inspect the page and in the Network tab of the console, click the image and see the details. In the response, if it is serving via CloudFront URL and see the x-cache: “Hit from Cloudfront”, then CloudFront is serving the images.
Error 1: Installation error because of ownership issues
Warning: fopen(/opt/bitnami/apache/htdocs/system/storage/session//sess_bb5cfd84f55cef397e6edd17cb): failed to open stream: Permission denied in /opt/bitnami/apache/htdocs/system/library/session/file.php on line 29Warning: flock() expects parameter 1 to be resource, bool given in /opt/bitnami/apache/htdocs/system/library/session/file.php on line 31Warning: fwrite() expects parameter 1 to be resource, bool given in /opt/bitnami/apache/htdocs/system/library/session/file.php on line 33Warning: fflush() expects parameter 1 to be resource, bool given in /opt/bitnami/apache/htdocs/system/library/session/file.php on line 35Warning: flock() expects parameter 1 to be resource, bool given in /opt/bitnami/apache/htdocs/system/library/session/file.php on line 37Warning: fclose() expects parameter 1 to be resource, bool given in /opt/bitnami/apache/htdocs/system/library/session/file.php on line 39
Solution Error 1: run command ‘sudo chown daemon:daemon -R .’
Fatal error: Uncaught Exception: Error: Variable 'sql_mode' can't be set to the value of 'MYSQL40'<br />Error No: 1231<br />SET @@session.sql_mode = 'MYSQL40' in /opt/bitnami/apache/htdocs/system/library/db/mysqli.php:40 Stack trace: #0 /opt/bitnami/apache/htdocs/system/library/db.php(45): DB\MySQLi->query() #1 /opt/bitnami/apache/htdocs/install/model/install/install.php(35): DB->query() #2 /opt/bitnami/apache/htdocs/system/engine/loader.php(248): ModelInstallInstall->database() #3 /opt/bitnami/apache/htdocs/system/engine/proxy.php(47): Loader->{closure}() #4 /opt/bitnami/apache/htdocs/install/controller/install/step_3.php(11): Proxy->__call() #5 /opt/bitnami/apache/htdocs/system/engine/action.php(79): ControllerInstallStep3->index() #6 /opt/bitnami/apache/htdocs/system/engine/router.php(67): Action->execute() #7 /opt/bitnami/apache/htdocs/system/engine/router.php(56): Router->execute() #8 /opt/bitnami/apache/htdocs/system/framework.php(165): Router->dispatch() #9 /opt/bitnami/apache/htdocs/system/startup.php(104): requir in /opt/bitnami/apache/htdocs/system/library/db/mysqli.php on line 40
Solution Error 2: Remove the MYSQL40. Find the code $db->query(“SET @@session.sql_mode = ‘MYSQL40′”); and remove the MYSQL40 so that the code looks like $db->query(“SET @@session.sql_mode = ””);
Error 3: AWS LightSail 500 Internal Server Error
Internal Server Error
The server encountered an internal error or misconfiguration and was unable to complete your request.
Please contact the server administrator at you@example.com to inform them of the time this error occurred, and the actions you performed just before this error.
More information about this error may be available in the server error log.
Solution Error 3: check if the .htaccess is there and rename it to a different till you fix the .htaccess file
Error 4: WARNING: UNPROTECTED PRIVATE KEY FILE!
@@@@@@@@@@@@@@@@@@@@@@@@@@@@@@@@@@@@@@@@@@@@@@@@@@@@@@@@@@@
@         WARNING: UNPROTECTED PRIVATE KEY FILE!          @
@@@@@@@@@@@@@@@@@@@@@@@@@@@@@@@@@@@@@@@@@@@@@@@@@@@@@@@@@@@
Permissions 0644 for '/Applications/MAMP/htdocs/webocreation-bk/LightsailDefaultKey-us-east-1.pem' are too open.
It is required that your private key files are NOT accessible by others.
This private key will be ignored.
Load key "/Applications/MAMP/htdocs/webocreation-bk/LightsailDefaultKey-us-east-1.pem": bad permissions
bitnami@3.238.31.110: Permission denied (publickey).
Solution Error 4: Give permission to the key file of 0644 by running “chmod 0644 pathofkeyfile“
Error 5: Error while generating the SSL certificate
Failed authorization procedure. dpsignadvertising.com (dns-01): urn:ietf:params:acme:error:unauthorized :: The client lacks sufficient authorization :: Incorrect TXT record "oujxGkfDXUloV5IUO3__gNQA47b1wePnF4rvUcQWclM" found at _acme-challenge.dpsignadvertising.com
Solution Error 5: Check the TXT record and wait till it propagates.
Error 6: Class ‘Scssc’ not found
Fatal error: Uncaught Error: Class 'Scssc' not found in /opt/bitnami/apache/htdocs/admin/controller/startup/sass.php:9 Stack trace: #0 /opt/bitnami/apache/htdocs/system/engine/action.php(79): ControllerStartupSass->index() #1 /opt/bitnami/apache/htdocs/system/engine/router.php(67): Action->execute() #2 /opt/bitnami/apache/htdocs/system/engine/router.php(46): Router->execute() #3 /opt/bitnami/apache/htdocs/system/framework.php(165): Router->dispatch() #4 /opt/bitnami/apache/htdocs/system/startup.php(104): require_once('/opt/bitnami/ap...') #5 /opt/bitnami/apache/htdocs/admin/index.php(26): start() #6 {main} thrown in /opt/bitnami/apache/htdocs/admin/controller/startup/sass.php on line 9
Solution Error 6: Check the vendor folder and upload the right Opencart version vendor folder.
Error 7: This site can’t be reached
This site can’t be reached
dpsignadvertising.com’s server IP address could not be found.
Try:
Checking the connection
Checking the proxy, firewall, and DNS configuration
ERR_NAME_NOT_RESOLVED
Solution Error 7: Either you just make DNS changes, so better to wait up to 1-2 hours. Or the IP address given is not correct.
Warning: mysqli::__construct(): (HY000/2002): Connection refused in /opt/bitnami/apache/htdocs/system/library/db/mysqli.php on line 7Warning: DB\MySQLi::__construct(): Couldn't fetch mysqli in /opt/bitnami/apache/htdocs/system/library/db/mysqli.php on line 10Warning: DB\MySQLi::__construct(): Couldn't fetch mysqli in /opt/bitnami/apache/htdocs/system/library/db/mysqli.php on line 10
Fatal error: Uncaught Exception: Error: <br />Error No: in /opt/bitnami/apache/htdocs/system/library/db/mysqli.php:10 Stack trace: #0 /opt/bitnami/apache/htdocs/storage12/modification/system/library/db.php(35): DB\MySQLi->__construct() #1 /opt/bitnami/apache/htdocs/system/framework.php(80): DB->__construct() #2 /opt/bitnami/apache/htdocs/system/startup.php(104): require_once('/opt/bitnami/ap...') #3 /opt/bitnami/apache/htdocs/index.php(31): start() #4 {main} thrown in /opt/bitnami/apache/htdocs/system/library/db/mysqli.php on line 10
Solution Error 8: Make sure your database server is not down.
In this post, we will focus on the importance of adopting strong security measures in mobile applications and the challenges that corporate cybersecurity departments face in guaranteeing the security of mobile devices.
Mobile application security is one of the most important components of the security strategy of any company. If we were to ask any CISO or director of cybersecurity at any company what the main difference is in the current cybersecurity infrastructure compared to a few years ago, they would surely answer: the environment is missing. And you won’t be wrong.
In the past, software development consulting firms only had to protect the technological framework that was in the organization. Today, however, connections to an organization’s applications and data are established from different points and through different devices.
The increase in hybrid work, as well as the access of suppliers and clients to the company’s data or applications, means that the attack fronts have multiplied. The vast majority of these accesses are carried out through different terminals, mainly smartphones, so data protection on mobile phones, access control in applications, and the management of different types of digital identities are essential to improve the protection of company data and infrastructure.
Some relevant actions
Smartphones can be a gateway for cybercriminals to access a company’s systems, both on-premises and deployed in a cloud environment so managing mobile vulnerabilities is a key task to guarantee security and prevent possible attacks if it can put an end to a company’s security doubts
Along with cybersecurity awareness, establish security policies on mobile devices, implement multi-factor authentication in apps, perform security audits for mobile applications or incorporate a security framework for applications, as well as protection technologies for software development solutions, mobile apps such as Cloud & Cybersecurity, are just some of the actions that must be incorporated into the cybersecurity strategy. Let’s see some of the most important ones:
Use data encryption
Smartphones store a significant amount of relevant data for any organization. Using data encryption in applications will reduce security risks in mobile apps, as it allows the protection of sensitive information, such as passwords, financial data, or customer data.
By using apps with data encryption you add an extra layer of protection that makes it impossible to access unauthorized data, even if your phone is lost, in addition, this encryption includes multi-factor authentication, so the risk of unauthorized access will be significantly reduced.
Perform security tests
When we talk about mobile application security, conducting security tests regularly is an important aspect that is not always taken into account. These tests will allow threat mitigation in mobile applications and discover possible vulnerabilities before they are exploited by cybercriminals.
Among the most common techniques are ethical hacking and mobile penetration tests that simulate attacks against mobile infrastructure to discover weaknesses.
Develop with a focus on security
Having security in custom enterprise software development is another important element when implementing a cybersecurity strategy for mobile environments. Also called “Security by Design”, it implies having security at all times: from the moment the app begins to be developed until its implementation. It is a concept in which security is a priority instead of waiting for the app to be developed and having to discover and patch vulnerabilities when it is already operational.
In short, it is increasingly important to implement a mobile application security policy because the possibility of an attack being successful is exponentially reduced. With this strategy, companies will be more protected, the cybersecurity strategy will be aligned with regulatory compliance in mobile apps, and the company’s image will be improved for users, clients, and partners.
New technologies are affecting all fields of knowledge in society thanks to their applications in very diverse fields. So much so that, from medicine to crop treatment, they can now be carried out with some improvements that go hand in hand with custom software development services.
This development towards a more digital world is what is called digital transformation, generating a space of shared knowledge that is updated in increasingly shorter periods. That is precisely what can be interpreted as innovation.
Technological innovation, therefore, can be considered as the introduction of methods, tools, and other types of technological products that generate substantial changes within the established status. In this context, it is easy to understand that, with effective technological advances, digital transformation must continue to advance in all entities.
Introduction to Technological Innovation
Since approximately 1970 and the first quarter of the 21st century, we have seen a technological escalation that is very difficult to predict. Although in some cases it is far below what was expected, the 2010s have taken technology to very high levels.
In less than 50 years we have gone from writing letters and waiting days or even weeks for a response to talking across distances of thousands of kilometers in real time. It is only a graphic example, but human beings have had to adapt to technological changes in record time. What a year ago was the latest, we now see it as an obsolete product.
Technology is growing by leaps and bounds and we must focus on technological innovation to embark on the path towards the 360º digital transformation of technology.
Types of Technological Innovation
In this way, technological innovation covers those elements and actions that are carried out to achieve the digital transformation of the business sector. We can distinguish three types of technological innovation taking into account the specific change that is committed:
Radical: are those that, in the business world, allow us to reach new markets. It may be because we have created a new product or service that opens the doors to other sectors.
Incremental: when we improve the technological processes that we already have implemented in our company.
Paradigm: when we create a new technological process that involves a substantial change in production.
Characteristics of Technological Innovation
Without a doubt, any business that wants to introduce innovation and embark on the path toward digital transformation must have three fundamental characteristics: efficiency, competence, and quality.
Renew or die is the premise that must be applied in any business sector. Therefore, we must be able to create or renew our products, services, and even their production processes. All this to adapt to the growing needs of the consumer and end client.
However, technological advances should not only focus on ‘what we sell’ but also on the organizational structure of our company. Have professionals with qualities for innovation and also train our staff. Even having external companies that can guarantee the incorporation of new business models adapted to the technological revolution that we are experiencing.
In short, carry out a general transformation where digitalization is the highlight of our company. From the management of our personnel, through the structure of our processes to the changes by technology. But, above all, our goal must be to meet the increasingly changing needs of our clients.
Achieve a global approach that leads us to the digital transformation of every one of our departments. To do this we must apply the latest technological revolutions that are going strong. This is the case of Big Data, Artificial Intelligence, or the Internet of Things (IoT).
Phases of Technological Innovation
Betting on technological innovation must be one of the priorities of the business sector. It is a long road, but it is a line of the future that guarantees business continuity. There are several phases of technological innovation:
Ideas → collection, evaluation, and release of ideas related to technological innovation.
Concept → Analysis of the solution, implementation, and commercialization of those ideas.
Solution → idea development and testing of finished product solutions.
Market → launch in which the product’s characteristics that can cover new needs detected for the client are praised.
There must be a transversal incorporation of all software development services. That is, our R&D department can begin the development of a new product or service. It can be done satisfactorily after analyzing all the data collected through our CRM with which we can know the behavior of our client and their changes. Surely, this idea that arises from good data analytics will have a much greater chance of success.
In conclusion, technological innovation is the first step towards digital transformation. The long path towards digitalization involves other factors to ensure that our company is adapted and can face the technological revolution 100%.
This Opencart user manual is for getting started with the Opencart online eCommerce website for 2024 for beginners, we are listing the best videos, blog posts, examples guides, tips, and tricks to run your Opencart shop successfully. We are showing both the frontend and backend management of Opencart.
In this opencart 4 user manual, we are showing how we can set up an online eCommerce store with Opencart 4 for 2024. This is a list of topics covering the Opencart user manual
Get a domain name and hosting – We use onlydomains.com as we can get a domain name at $8 which is the cheapest that we found and for hosting you can use Google Cloud which gives $300 for free or use another hosting as per your choice.
In the above tutorial, we will show how to install Opencart and set up the custom URL with the virtual host.
Login into Opencart Administration
Go to http://YOURURL/admin, enter your username and password and you will be in the Administration section.
Admin user profile change in Opencart
In the default Opencart installation the default user’s First Name and Last Name is John Doe so to change it just click in the John Doe on the top right corner and click “Your Profile” Then you can change the User details, and we will show you how to change by going on System Users later.
Change as per your username. first name, last name, email, image, and password.
System
In the System section, we manage and enable global or system settings of the Opencart eCommerce store like users, localization, languages, statuses, length, weight classes, and many more.
Settings
All settings details of the Opencart are in the link below, which shows local settings, options, mail settings, and server settings.
In localization, we manage the local values of the stores like store locations, languages, currencies, stock statuses, order statuses, returns, countries, zones, geo sones, taxes, length classes, and weight classes.
Opencart supports multi-language, so the languages section manages the languages for the store, by default it has the English language. We can upload a new language, add a new language, set a different default language than English, and create a new custom language pack for Opencart. Check the following two links for languages:
Go to admin >> System >> Localization >> Currencies where you will see the currencies available for use in the storefront. In the store by default is the US dollar. There are Euro, Pound, and US dollars. Go to the following post to learn all about the currencies in Opencart.
In Opencart 3 we can manage the stock statuses. For that go to admin >> System >> Localization >> Stock Statuses then you can enter the Stock Status Name. For details go to the following post for stock statuses:
In Opencart 3 we can manage the order statuses. For that go to admin >> System >> Localization >> Order Statuses then click “Add New” and you can enter the Order Status Name. For detail go to the blog post:
Returns (Return Statuses, Return Actions, and Return Reasons)
Opencart 3 has return functionalities by default. In this Opencart user manual, we are showing you how returns are managed and handled in Opencart 3 by the site administrator and customer. Read the following post for details:
Length Classes and Weight Classes management in Opencart
Opencart user manual where we are showing how we can manage length classes and weight classes. These lengths and weights are used by Shipping extensions like FedEx, UPS, etc, and will be used by Shipping API to calculate the shipping cost.
We can add manufacturers and brands in Opencart and assign them to products and brands to have their own pages. The video shows how to create the brands or manufacturers in Opencart:
Edit the Contact Us page and add a Google map to the Contact Us page
All the Contact Us page contents are handled from the settings, so if you have read the above settings posts then you can see how to change the contact addresses, phone numbers, and other stores. In the video below we show we can add Google Maps to the Contact Us page.
If you are selling products where you can distribute the prices in installments then the recurring profiles are ways to set up, likewise we products with a subscription. See the video below, where it is described how to set up the recurring profiles.
In this Opencart tutorial, you will learn how to add HTML in Opencart, similarly how to add Google Analytics, Google Tag Manager, Adroll, Facebook pixels, MailChimp conversion code, Google Ads conversion in success page only, and other third-party JavaScript code in the Opencart, likewise our best way to manage the JavaScript code through google tag manager and test and preview in the google tag manager.
We hope these lists of videos and blog posts will help you to start the Opencart shop and go deeper into it. Please don’t forget to post your questions comments or errors so that we can help you. You can follow us on our Twitter account @rupaknpl. Subscribe to our YouTube channel for Opencart tutorials, and click to see all Opencart user manuals.
Over the past few years, PWAs have been subject to a lot of evolution, many big IT companies like Twitter, Pinterest, and Ali Express, among many others, adopted the concept and created impressive products. But are PWAs the right product for your business? This article can help you decide.
PWAs are the evolution of web applications and responsive websites, trying to evolve the web browser experience to a native mobile experience, but are PWAs the right product for your business? First, let’s talk about the advantages, disadvantages, and limitations of a progressive web application.
There are key advantages when comparing a PWA to a web app (a traditional mobile website).
Connectivity independence, allows the PWA to work offline most of the time (after the first visit).
App-like appearance, which helps to remove the search bar from the web browser when you download the PWA on your device.
Greater product visibility, because you can open your PWA in a web browser or find it on the Google Play Store and Microsoft Store available for download.
Push notifications. By using web notifications as native push notifications on Android.
Faster experience, due to its background processing feature, meaning progressive web apps integrate better with mobile hardware.
In conclusion, PWAs offer a significant improvement over traditional responsive websites.
Disadvantages
All the disadvantages are revealed when comparing PWAs with mobile apps (Native and hybrid):
Mobile applications have adequate access to the low-level hardware components of mobile devices such as accelerometer, NFC, and Bluetooth, PWAs are limited by the limitations of the web operating system.
Local memory limitations, because PWAs use cache memory for local storage.
Perceived security of sensitive information in local storage.
PWAs are slower than mobile apps. Therefore, the UX suffers, especially for video games and applications that require high processor usage.
User Interface for custom sophisticated graphical interfaces, because native mobile apps have better and more evolved visual frameworks.
Generally speaking, you should be careful when thinking about modifying your mobile app to a PWA.
Limitations
All limitations presented at this time are related to iOS. Even this operating system has enabled some functionalities for PWAs. However, we can see some restrictions compared to others (such as Android and Windows 10)
There are no push notifications.
You can’t access components like Face-Id, AR Kit, and Bluetooth.
Less cache memory usage (50 MB).
iOS purges the cache frequently, affecting offline functionality and local storage.
No visibility in the app store.
All limitations are intended to be removed in the near to medium-term future, although it is necessary to take them into account and review the notes for new iOS versions.
The Business Perspective
Now that the most relevant arguments are presented, it is necessary to determine the main characteristics of your desired (or existing) product, the stage of your business, and the costs (creation and maintenance).
Early Stage Startups
Typically, for IT-based MVPs, it is necessary to have products that are fast and focused on market goals, and not think about complex product developments. Entrepreneurs therefore seem forced to decide on a web application or a mobile application development. With a PWA, taking into account the limitations and disadvantages, which should not be an obstacle for the development of an MVP (generally), it is possible to create a product for both approaches (web and mobile).
In terms of cost and development time, the difference between developing an MVP web application and a PWA does not exceed 10% — 15%, and the maintenance efforts are very similar.
The visibility of a PWA product is an advantage. With just one development, you can have a website + mobile website + mobile app, and now add your PWA to Google Play (hopefully in the future also App Store). That way, you’ll have more potential users and test your solution in the market faster.
Startup Refinement and Scaling Stages
If you already have:
A web application was developed, the updated version is a PWA and migration is something to consider. It’s crucial to be careful with your development team about these migration efforts, especially if your product is older than two years.
A mobile application, be aware of the limitations and especially the disadvantages of a PWA. Generally, if your mobile app is a market-like product, a PWA would fit as a suitable replacement, because it gains visibility on the web and will not sacrifice the functionality of your mobile app. But, if your app runs on low-end hardware or any other advantages of the mobile apps presented above, keep maintaining your mobile app. Creating a separate PWA will help you get web viewing and users.
Ready to take your web application to the next level? Our web application development services are here to help you build a top-notch Progressive Web App. Get in touch with us now and let’s bring your vision to life!
Established Companies
Regularly, IT solutions provided by established companies are 360-degree offerings that include cloud, web, and mobile applications, and even desktop applications. Our suggestion for existing products is the same as for the scaling stages of startups, thinking mainly about optimizing maintenance costs. For new web-based products, we suggest using progressive web apps instead of web apps.
We suggest reviewing with your custom software development company all the aspects and considerations to take into account focused on the peculiarity of your business when thinking about developing a PWA or migrating your applications to a PWA. At Sparkout Tech we will be happy to advise you, so do not hesitate to contact us.
Welcome to the complete guide to UI UX design services, a field that is rapidly gaining importance in the digital world. We will explore the fundamental concepts, the differences between UI and UX, and the steps involved in the design process. You’ll also find resources to help you build a strong portfolio, job market information, and course and tutorial recommendations. So, let’s dive into the exciting world of UI/UX design and discover how it shapes our digital experiences.
Table of Contents
Introduction to UI/UX design
1. Importance of UI/UX design
2. UI vs UX: Understanding the Difference
Getting started with UI/UX design
1. How to start your UI/UX design journey
2. Why choose a career in UI/UX design?
3. Self-taught education versus formal education
The UI/UX design process
1. Steps and stages in UI/UX design
2. Principles and best practices
3. Guides and practical resources
4. Importance of designing for everyone
UI/UX design tools and software
1. Popular tools for UI/UX design
2. Free resources and tutorials
3. Excel in UI Design
Advanced UI/UX concepts
1. Creative UI/UX Design
2. Graphic design versus UX/UI design
3. UI/UX design challenges and solutions
Conclusion and future of UI/UX design
1. The evolution of UI/UX design
2. Predictions for the future
3. Resources
Introduction to UI/UX design
Welcome to the fascinating world of UI/UX design! If you’ve ever interacted with a digital product, whether it’s a mobile app, a website, or even the interface of a smartwatch, you’ve experienced the results of UI/UX design. Let’s dig deeper and discover the magic behind those interactions.
Why is UI/UX design so important?
Imagine walking into a store with items scattered everywhere, with no labels and no one to guide you. Frustrating, right? This is how users feel when they interact with a poorly designed digital product. UI/UX design is the unsung hero that ensures that users not only use a product but love using it.
User Retention: A well-designed interface can make the difference between a user returning to your app or website and uninstalling it or abandoning it forever.
Business growth: Satisfied users generate more referrals, positive reviews, and higher revenue. A pleasant user experience can significantly improve business metrics.
Reduced costs: Investing in good UI/UX design upfront can save money in the long run by reducing the need for costly redesigns or fixes.
Did you know? According to Forrester Research, every dollar invested in UX generates $100 in return. That’s a return on investment of an astonishing 9,900%!
UI vs UX: Understanding the Difference
Ah, the old debate: UI versus UX. While they often come together in a single moment, they are distinct, and each with its own set of responsibilities and outcomes.
UI (user interface): Think of UI as the visual design of a product. It’s everything you interact with directly: buttons, text, images, sliders, and even animations. It is the appearance of the product. A user interface designer decides how the application will look.
In the code above, the UI is defined by the color, padding, and other visual styles of the button.
UX (User Experience): UX, on the other hand, is the experience a user has while interacting with your product. It’s about the overall feel and user journey. A UX designer maps out the user journey, ensuring it is intuitive and fluid.
In this pseudocode, the UX focuses on ensuring that if a user forgets their password, they have the option to reset it, providing a seamless experience.
Simply put: If UI is the “what” (what the user interacts with) of a product, UX is the “how” (how they feel about their entire interaction).
Getting started with UI/UX design
Are you embarking on a journey towards UI UX design services Fantastic choice! The digital realm is expanding and with it, the demand for skilled UI/UX designers is skyrocketing. Whether you’re a newbie or a professional looking to get into this field, there’s a lot to be excited about. Let’s dive into how you can start your journey, the advantages of choosing this career, and the age-old debate: self-taught versus formal education.
How to start your UI/UX design journey
Taking the first step:
Getting started with UI/UX design can be overwhelming, but remember, every expert was once a beginner. Here’s a roadmap to guide you:
Research and curiosity: Start by understanding what UI/UX really means. Websites like Nielsen Norman Group offer a large number of articles that can give you basic knowledge.
Hands-on Practice: Start with simple projects. Redesign your favorite app or website. Use tools like Figma or Adobe XD for this. Here’s a basic example to get you started:
Feedback and iteration: Share your designs with friends, family, or online communities. Use your feedback to improve.
Why choose a career in UI/UX design?
The appeal of UI/UX:
High demand: With the digital transformation of companies, the demand for good UI/UX designers is increasing. Companies understand that a good user experience translates into customer retention.
Creativity and problem-solving: UI/UX design is the perfect combination of creativity and analytical thinking. Every project is a new challenge, ensuring you’ll never have a dull day.
Financial Rewards: According to Glassdoor, the average salary for a UI/UX designer is quite competitive, with opportunities for growth.
Self-taught education versus formal education
The path you choose:
Self-taught: The Internet is a gold mine. With platforms like Udemy, Coursera, and countless YouTube tutorials, you can learn at your own pace. The key is consistency, practice, and seeking feedback.
Formal education: Universities and design schools offer structured programs with experienced professors, peer interaction, and often placement opportunities. Schools like General Assembly have immersive courses that cover the breadth and depth of UI/UX.
Remember: whether you choose to be self-taught or opt for formal education, the design industry values your portfolio and practical skills above all else. So, keep designing, iterating, and learning!
The UI/UX design process
Immersing yourself in the world of UI/UX design is like embarking on an exciting journey. Every step is crucial, from understanding the user’s needs to creating the final design that delights and resonates. Let’s unravel the intricate web of the UI/UX design process, exploring its stages, principles, and the importance of inclusivity in design.
Steps and stages in UI/UX design
Mapping the journey:
The UI/UX design process is a structured approach to creating meaningful digital experiences. Here’s a breakdown:
Research: This is the basis. Understand your users, their needs, pain points, and aspirations through methods such as surveys, interviews, and user profiles.
Ideation: Brainstorming solutions. Sketch rough ideas, create mood boards, and discuss possible design directions.
Wireframing: Write a skeletal structure of your design. Tools like Balsamiq or Axure can be helpful.
Prototyping: Bring your wireframes to life. Create clickable prototypes using tools like Figma or Adobe XD.
Testing: Validate your designs. Conduct usability tests, collect feedback, and iterate.
Implementation: Hand over your designs to developers. Ensure seamless collaboration using platforms like Zeplin.
Review and iterate: After launch, collect user feedback, analyze metrics, and refine your design.
Principles and best practices
The golden rules:
UI/UX design is not just about aesthetics; it’s about functionality, usability, and user satisfaction. Some guiding principles include:
Consistency: Maintain a consistent design language at all times.
Feedback: Always provide feedback to users, whether through animations, messages, or sounds.
Simplicity: often less is more. Keep interfaces clean and intuitive.
Accessibility: Make sure your designs are usable by everyone, including those with disabilities.
Guides and practical resources
Your Design Toolkit:
The Internet is a treasure trove of resources for both novice and experienced designers. Some gems include:
Books: “Don’t Make Me Think” by Steve Krug and “The Design of Everyday Things” by Don Norman are must-reads.
Online Courses: Platforms like Coursera, Udemy, and LinkedIn Learning offer a large number of UI/UX courses.
Communities: Join forums like Designer Hangout or Behance to connect, share, and learn.
Importance of designing for everyone
Inclusivity in design:
Designing for everyone means ensuring your designs are accessible and usable by everyone, regardless of age, gender, ability or background. Here’s why it’s crucial:
Broader Reach: Inclusive designs speak to a broader audience, increasing the reach and impact of your product.
Ethical responsibility: Everyone deserves a perfect digital experience. It is our duty as designers to provide that.
Innovation: Designing for diverse user needs can generate innovative solutions and differentiate your product.
UI/UX design tools and software
The digital design landscape is vast and having the right tools can make all the difference. Whether you’re just starting out or looking to refine your toolset, this section will guide you through some of the most popular and effective tools in the world of UI/UX design. Let’s dive in!
Popular tools for UI/UX design
The designer’s arsenal:
Sketch: A vector-based design tool exclusive to Mac, Sketch is known for its simplicity and efficiency. It is perfect for creating interfaces, websites, and icons.
Adobe XD: As part of the Adobe suite, Adobe XD offers design, prototyping, and collaboration all in one place. It is available for both Mac and Windows.
Figma: Figma, a cloud-based tool, enables real-time collaboration. It is platform-independent and is rapidly gaining popularity among designers.
InVision – InVision is a prototyping tool that allows designers to create interactive mockups for web and mobile projects.
Balsamiq: If you like wireframing, Balsamiq is a fantastic tool that replicates the experience of drawing on a whiteboard.
Axure: For those who require more detailed and dynamic prototypes, Axure offers advanced interactions and functionalities.
Free resources and tutorials
Learning never stops:
Coursera UI/UX Design Specialization – This course offers a comprehensive introduction to the world of UI/UX design.
Udemy – Platforms like Udemy have a large number of design courses, often at affordable or even free prices.
YouTube: Channels like The Future and DesignCourse offer valuable information and tutorials on UI/UX design.
Design blogs: Websites like Smashing Magazine and UX Design.cc are treasure troves of articles, case studies, and tutorials.
Excel in UI Design
Harnessing the power of spreadsheets:
Why Excel? While unconventional, Excel offers a grid system that can be leveraged for basic layout layouts. It is especially useful for those who do not have access to specialized design software.
Creating layouts: By adjusting the size of cells and using the merge feature, you can create button shapes, input fields, and more.
Color and style: Excel allows cell shading, border adjustments, and font style, allowing for a basic visual representation of your design.
Prototyping: With hyperlinks and macro functions, you can create interactive prototypes, linking different sheets to represent different pages or views.
Example: Imagine designing a simple login page. Column A can represent labels such as “Username” and “Password.” Adjacent columns can be combined to create input fields. A button can be styled using a thicker border and a contrasting fill color. By linking this button to another sheet, you can simulate the transition to a dashboard upon “login”.
Advanced UI/UX concepts
As the digital landscape continues to evolve, so does the realm of UI/UX design. Advanced concepts are emerging that push designers to think beyond traditional boundaries and embrace new challenges. In this section, we’ll delve into some of these advanced concepts, shedding light on the nuances of creative design, the distinction between graphic design and UI/UX, and the challenges designers face in today’s dynamic environment.
Creative UI/UX Design
Pushing the boundaries of design:
Microinteractions: These are subtle animations or design elements that guide users and enhance their experience. For example, a “Like” button that animates when clicked can delight users and make the interaction seem more tangible.
Dark Mode Design: With platforms like macOS and Android offering dark mode, designers are now tasked with creating interfaces that look stunning in both light and dark themes.
Voice User Interface (VUI): As voice assistants like Alexa and Siri become more prevalent, designing for voice interactions becomes crucial. This involves crafting responses, designing voice prompts, and ensuring a seamless listening experience.
Augmented Reality (AR) in UI/UX: AR offers a combination of the digital and physical worlds. Designing for AR means considering spatial layout, user environment, and interactive elements that feel natural in a 3D space.
Graphic design versus UI/UX design
Understand the nuances:
Purpose: While graphic design often focuses on conveying a message or evoking emotions through images, UI/UX design aims to enhance the user experience and facilitate user interactions with a product.
Tools: Graphic designers may rely heavily on tools like Adobe Illustrator or Photoshop, while UI/UX designers typically use software like Figma, Sketch, or Adobe XD for interface design and prototyping.
Final Product: A graphic designer’s final product can be a poster, logo, or brochure. On the contrary, the output of a UI/UX designer is a functional and interactive design, whether it is a website, an application, or a software interface.
Feedback loop: UI/UX design often involves continuous iterations based on user feedback and testing, ensuring the design meets user needs and provides a seamless experience.
UI/UX design challenges and solutions
Navigating the design labyrinth:
Challenge: Design Consistency: With multiple designers working on a product, maintaining a consistent design language can be a challenge. Solution: Using design systems or style guides can ensure consistency across different parts of an application or website.
Challenge: Adapting to different screen sizes: From smartphones to desktops, ensuring a design looks and works well on all devices is a major challenge. Solution: Responsive design and mobile-first approaches, combined with rigorous testing across multiple devices, can ensure a consistent user experience.
Challenge: Keeping up with trends: The world of design is constantly evolving and what’s hot today may be outdated tomorrow. Solution: Continuous learning, attending workshops, and updating design blogs and communities can help designers stay ahead of the curve.
Challenge: Balancing Aesthetics and Functionality: Striking the right balance between a visually appealing design and a functional one can be difficult. Solution: User testing and feedback can provide insights into what works and what doesn’t, allowing designers to make informed decisions.
Conclusion and future of UI/UX design
As we wrap up our exploration of UI/UX design, it’s essential to reflect on the journey so far and look forward. The digital landscape is constantly evolving, and with it, the realms of UI and UX design continue to expand, adapt, and innovate. Let’s delve into the evolution of this dynamic field and make some educated guesses about its future trajectory.
The evolution of UI/UX design
From pixels to experiences:
Humble Beginnings: Do you remember the early days of the Internet? Websites with clunky layouts, limited colors, and basic typography. The focus was primarily on functionality, without regard to aesthetics or user experience.
The Rise of Mobile: With the advent of smartphones, UI/UX design underwent a seismic shift. Designers had to rethink interfaces for smaller screens, leading to the birth of mobile-first design and responsive designs.
Focus on the user: As technology advanced, so did the understanding of the importance of the user. Companies began to realize that a pleasant user experience could be a competitive advantage. This marked the beginning of an era where design thinking and user focus became paramount.
Technology integration: Augmented reality (AR), virtual reality (VR), and voice user interfaces (like Siri or Alexa) have added new dimensions to UI UX design agency, pushing designers to think beyond the traditional screen-based interfaces.
Predictions for the future
Charting the unexplored:
AI and personalization: With advances in artificial intelligence, expect interfaces that adapt in real-time to user needs. Imagine a music app that changes its user interface based on your mood, detected by biometric sensors!
Beyond the screen: As AR and VR technologies mature, designers will create experiences that combine the digital and physical worlds. This will challenge designers to think in 3D, creating immersive experiences that are intuitive and engaging.
Voice and gestures: As voice assistants become more sophisticated and gesture recognition technologies advance, screenless or minimally displayed interfaces will become more common. Designing for these modalities will require a shift in thinking, focusing more on auditory and motion design.
Ethical design: With growing concerns about privacy and the impact of technology on well-being, there will be a greater emphasis on ethical design. Designers will need to ensure that products are not only easy to use but also respect the rights and mental health of users.
PHP is a flexible language for enterprise application development, in which efficiency and scalability are paramount. From its humble beginnings in web programming, PHP has now become the main tool for creating enterprise-level applications that can meet the diverse needs of today’s enterprises.
PHP is used by 76.4% of all websites. PHP helps developers create combined, fast, and more secure e-commerce and CRM platforms to enable business growth and innovation. Let’s discuss how PHP for enterprise application development enhances efficiency and scalability.
How does PHP help in enterprise app development efficiency and scalability?
In the ever-busy business world where every second matters, developers are challenged to deliver reliable, scalable, and robust products and services. PHP and other cutting-edge technologies give companies the ability to design and release first-to-market apps. Enterprise app solutions are tailored to the individual organization and they are composed of multi-purpose components.
The PHP framework follows best practices to avoid complexity and duplication, making the code consistent, readable, and reusable. The framework’s modularity and usability allow for continuous optimization. Identity, routing, and dependency injections are pre-coded, and some essential functionalities may be used.
Among the many ways PHP can improve enterprise app development in terms of speed and scalability are the following:
It can build different types of enterprise apps
The most common kinds of business applications developed and deployed with PHP are as follows:
Enterprise resource planning (ERP) systems
ERP systems can be easily designed using PHP, regardless of the size of the company. PHP can guarantee consistency while also making all of its components more accessible to diverse departments.
Business intelligence (BI) software
PHP development solutions can improve your company’s data-driven decision-making with the help of business intelligence tools. Marketing, manufacturing, and human resources are just a few of the many data sources that may be accessed by PHP enterprise apps.
In order to forecast patterns, spot trends, and generate precise predictions, business intelligence systems might use data mining techniques and sophisticated mathematical analytical algorithms.
Business process management (BPM) apps
The primary goals of business process management applications are the automation of routine tasks and the elimination of unnecessary ones. Streamline your company’s operations with BPM enterprise apps developed with PHP.
Maximize productivity, remove errors, and build smooth processes. In addition to preventing operational delays, PHP guarantees business continuity for these apps.
Customer relationship management (CRM)
Companies can improve their CRM strategies by utilizing PHP. To make sure no opportunity is missed, speed up query resolution, and personalize user interactions, PHP apps are a great choice.
Companies may monitor client interactions, streamline onboarding, and increase customer loyalty. To better understand consumer habits and increase interaction, PHP apps can synthesize data discoveries. If used collectively, these apps have the potential to increase industry visibility and profitability.
The supply chain management (SCM) tools
Organizations can create their own custom tools for supply chain management with the aid of PHP. It ensures smooth delivery, instant sales, and profound control over inventory and resource management.
The PHP-based PHP enterprise management software that is intended for supply chain management may increase communication between suppliers and customers and manage the supply chain more efficiently at all levels. When it comes to supply chain management, PHP has you covered in every way: such as warehousing, material ordering, logistics, order processing, procurement, and others.
Human resource management (HRM) apps
Finding appointments, performance management, and monitoring, among others, are seen by HRM apps as their functions in businesses. The larger companies can automate routine processes and look at reports, payrolls, and productivity.
Human Resource Management software, developed in PHP, can assist in simplifying HR processes, easy planning of the workforce, and ease tedious administrative tasks. Training courses for employees that are suitable and an easier way of hiring or retaining people are also among the advantages.
It’s free, fast, and open-source
PHP constitutes an open-source and affordable solution for enterprises. In this way, budget-conscious startups and small firms can create scalable enterprise apps.
This can be easily done when you hire dedicated PHP developers who can provide powerful solutions that boost your PHP apps. PHP’s many caching mechanisms speed up website and app development. These methods boost scalability and reaction time.
Load balancing and asynchronous processing
PHP’s load balancing, which uses many servers to handle user requests, is another feature. Apache, HAProxy, and Nginx assist PHP in distributing workloads and optimizing performance.
It easily handles large traffic and ensures application availability. PHP uses ReactPHP and Swoole for asynchronous processing. Developers may optimize server resources and work faster.
Optimizes database queries and operations
PHP packages like Eloquent, Doctrine, and Propel optimize database queries. PHP monitors application performance in real-time and suggests improvements.
New Relic, Blackfire, and Xdebug help with profiling, performance analysis, and debugging. PHP developers may optimize code, streamline user interactions, and detect performance issues with these tools.
PHP has pre-built XML parser and database administration modules, reducing development costs. Businesses enjoy PHP projects because developers can write less code, test faster, and maintain well. PHP projects are secure, scalable, and desirable.
Multiple PHP frameworks for different applications
There are several scalable, user-friendly, and versatile PHP frameworks. Business ventures use many PHP frameworks depending on their demands. Laravel, Codeigniter, Slim, Symfony, and Zend are popular PHP frameworks worldwide.
Slim is simple and powerful, but Zend is known for its modularity and updated codebases. Slim supports RESTful APIs, HTTP caching, URL routing, and cookie encryption. It’s simple and supports flash messaging. Database engine independence, quick setups, and reusable components distinguish Symfony from other frameworks. Integrating most libraries and vendor resources is simple.
Laravel can handle complex backend demands, making it ideal for small and large enterprise apps. Most developers use PHP for bespoke app development due to its security, authentication options, template engine, MVC design, etc.
Conclusion:
In today’s competitive market, using PHP for enterprise application development simplifies operations and sets the stage for long-term growth. Since its introduction to the software and app development scene, PHP has made great strides, and every enterprise application has its unique requirements.
It is ideal for creating both basic and advanced projects, making it one of the most flexible programming frameworks. If you want to get the most out of the framework, you should be well-versed with object-oriented programming languages, databases, MVC architecture, the command line tool, and object-oriented relationship management systems.
Most entrepreneurs have the natural ability to come up with unique business ideas. But turning these ideas into a tangible business venture isn’t always as easy as it sounds.
Turning an idea from a simple concept into something that can be monetized and can support a business model can be challenging for anyone. But for business owners who take the right first steps, they’ll be more likely to improve their success rate.
Validate Your Idea
The first step every new business owner should take before getting started is to validate their ideas. This involves having a deeper understanding of the market and how much demand is currently out there. This will help businesses from investing too heavily in ideas that may not result in the necessary returns.
One effective way this can be handled is through market research. Market research lets businesses identify who their potential customers are while getting a clearer understanding of any specific pain points they may be experiencing.
This doesn’t need to be an overly complex process and can be done by conducting surveys or simply asking for feedback from a small group of close friends or family. The most important part is to identify whether or not there seems to be an actual need for the solution you intend to in order, and of course if people think it’s something worth buying.
Develop a Business Plan
After you’ve done the necessary legwork to validate your idea, you’ll want to start developing a detailed business plan that can help you transform it into a profitable business. These documents can and should be fairly detailed, outlining everything from how you’ll structure the business to relevant market trends or financial forecasts.
A business plan should be viewed as a construction blueprint. When a new home build or renovation project is underway, blueprints are essential to ensuring that all the necessary steps are followed correctly.
It’s no different in business, and a well-constructed plan can make sure that as your company grows, it takes the right approach to its sales and operations efforts while still ensuring the company stays within budget.
Secure Funding
An essential element of running a successful startup company is having adequate funding. This is where a new business owner will need to weigh their options and decide whether or not they’re willing to give up equity to an angel investor or decide to fund the startup primarily on their own.
There are pros and cons associated with either decision, and the path you choose will be dependent on how much control you want to maintain with the business over time. In any event, you’ll want to draft a persuasive pitch for your business that highlights how and why it’s unique in the industry and the goals you’re looking to achieve.
When approaching an investor, it’s important to remember that potential backers aren’t necessarily investing in a product – they’re investing in you. This means that while numbers and figures may be important, your enthusiasm or knowledge of the industry is what tends to attract the most attention.
Build a Strong Team
For your startup to succeed, you need a great team backing you. This isn’t always the easiest thing to do since startup companies typically don’t provide the level of stability that many employees look for in an employer. Still, working with a small (but growing) organization has a lot of upside for new employees, and finding the right mix of passion and skillsets can be a game changer.
For you to find and keep the talent you need, especially through the challenging initial stages, it’s important to quickly establish a positive working culture. Show that you value communication early on and make your team feel like they’re a big part of moving the business forward.
Network and Build Partnerships
As a new business, it’s important to take the time to grow your network regularly. This includes creating mutually beneficial partnerships that can help you establish credibility out of the gate.
Networking events or tradeshows are a great place to start when looking for like-minded brands to connect with. Even if you don’t start working with your new connections right away, getting to know as many professionals as possible in your niche gives you great exposure as your business starts to carve out its path.
You can also use different online platforms to promote your brand and communicate more regularly with your potential customers. Professional social media sites like LinkedIn can be a great source of industry information and let you connect directly with other brands in your industry.
Protect Your Intellectual Property
When many new business owners launch their new ideas, they aren’t always focused on the legal components of their business and instead put most of their energy into getting things up and running. Still, it’s important to take the necessary steps to make sure your business is protected long-term.
It’s critical to protect your assets from unwanted trademark or copyright issues down the road. As your business grows and you start to own more market share, you’ll no doubt get more attention from other established companies or aspiring business owners who might want to capitalize on your ideas.
By investing some of your resources early and going through the necessary legal process, you can protect your long-term business interests and provide better assurances to your potential investors.
Focus on Sales and Marketing
There can be a bit of a mental struggle early on for entrepreneurs when it comes to balancing product development with sales and marketing initiatives. Every business owner views these priorities differently. While some want to put more focus and energy into quality assurance and innovative design concepts, others are more interested in seeing quick returns.
Still, it’s important to have a strong go-to-market strategy that can be executed early on. This makes sure you’re not swimming in debt before revenues start to come in. There are a lot of different marketing avenues you can explore which will depend on your budgeting needs.
The important thing to remember is that you’ll no doubt be up against many competitors. And the longer you wait to start marketing yourself, the longer it will take to see financial rewards.
Prepare for Scale
Every business owner wants to see their company grow. Still, if you’re not ready for the changes you’ll need to make to support that growth, you’ll probably not see the benefits you were hoping for.
To scale properly, you’ll need to have the right structure in place. This may involve investing in different areas of your business, including your IT infrastructure as well as staffing resources.
To simplify this, you can look for business solutions like cloud-based systems or SaaS (Software-as-a-Service) platforms that are designed to scale up or down with your business as needed. This, along with deciding to work with remote teams, can help you avoid having to make expensive upfront investments to get your business running.
Get Your Startup Idea Off the Ground
Make no mistake – beginning a startup company isn’t an easy process. It takes patience and an organized process to make sure your business idea successfully translates into a profitable venture.
However, if you go in with the right mindset, carefully construct your business plan, and surround yourself with a great team, you’ll have the foundation you need to watch your company grow.
To work as efficiently as possible with Kubernetes, the workload must be distributed in a manageable way between different pods. This is where the load balancer takes center stage.
What is a load balancer in Kubernetes?
A load balancer is used to distribute the load to be handled by servers or virtual machines to improve overall performance Usually, a load balancer is placed in front of servers to prevent overloading of individual servers. However, we must distinguish between two types of load balancers in Kubernetes:
Internal Kubernetes load balancers
External Kubernetes load balancers
Internal Kubernetes load balancers
Although the internal Kubernetes load balancers are briefly presented, the article will focus on the external ones. Compared to classic load balancers, an internal load balancer takes a different approach and ensures that only applications running in the same virtual network as your Kubernetes cluster can access it.
External Kubernetes load balancers
External load balancers assign a Kubernetes cluster service node its IP address or DNS name so that it can receive external HTTP requests. This load balancer is a special type of Kubernetes software development service and routes external traffic to individual pods in your cluster. In this way, the best distribution of incoming requests is ensured.
There are several algorithms for configuring load balancers in Kubernetes. The choice depends entirely on how you want to use it.
What is the Kubernetes load balancer for?
A Kubernetes load balancer defines a service that runs on the cluster, accessed over the public Internet. For a better understanding, you have to take a look at the Kubernetes architecture. A cluster contains multiple nodes, which in turn is made up of multiple pods. Each of these pods is assigned an internal IP that is inaccessible from outside the cluster. This also makes sense, since pods are created and deleted automatically, with IPs reassigned.
A Kubernetes service is often required for software running on pods to be used with a fixed address. In addition to the load balancer, there are other services that are suitable for various application scenarios. But all custom software development services have in common that they attach several pods into a logical unit and describe how to access them:
The Kubernetes load balancer serves to optimally distribute external traffic to the pods of your Kubernetes cluster. Therefore, it can be used in numerous situations, for almost any purpose. The fact that Kubernetes load balancers can direct traffic to each of the pods ensures that the cluster has high availability. If a pod stops working or has errors, the load balancer distributes the tasks among the other pods.
With load balancers, scalability is also improved. If incoming traffic is determined to require less or more resources than are currently available, Kubernetes can respond by automatically creating or deleting pods.
We explain how to create a load balancer for Kubernetes
To create a Kubernetes load balancer, you need your cluster to run in a cloud or an environment that supports setting up external load balancers.
When creating a Kubernetes load balancer with IONOS, the cluster node receives a static IP that allows the service to be addressed from outside the cluster.
The configuration of a Kubernetes load balancer could, for example, look like this: The service groups pods with the web app selector. Incoming traffic that has used port 8080 along with the load balancer IP is distributed to the individual pods.
We were working to show the webocreation.com blog post to the rupaknepali.com.np but it keeps on showing the CORS policy error. So to fix that we implemented some transform rules in the Cloudflare as the webocreation.com was configured with it.
JavaScript Code to fetch RSS feed URL and convert it into the HTML
The code below fetches the content from https://webocreation.com/feed/ converts it into HTML and adds it to the rss-container div.
Access to fetch at 'https://webocreation.com/feed/' (redirected from 'https://webocreation.com/feed') from origin 'https://rupaknepali.com.np' has been blocked by CORS policy: No 'Access-Control-Allow-Origin' header is present on the requested resource. If an opaque response serves your needs, set the request's mode to 'no-cors' to fetch the resource with CORS disabled
Fix: Access to fetch from origin has been blocked
As webocreation.com uses Cloudflare to fix the CORS issue we need to configure it into Cloudflare. For that go to Cloudflare Admin >> Rules >> Transform Rules
Output
The output seems like the following:
In this way, we fixed the access to fetch at ‘https://webocreation.com/feed/’ (redirected from ‘https://webocreation.com/feed’) from origin ‘https://rupaknepali.com.np’ has been blocked by CORS policy: No ‘Access-Control-Allow-Origin’ header is present on the requested resource. Please don’t forget to post your questions comments or errors so that we can help you. You can follow us on our Twitter account @rupaknpl. Subscribe to our YouTube channel for Opencart tutorials, and click to see all Opencart user manuals.
In the digital landscape, where visibility and discoverability are crucial for online success, search engine optimization (SEO) plays a pivotal role in driving organic traffic to websites. While various factors influence search engine rankings, strategic keyword placement within HTML tags remains a fundamental aspect of effective SEO strategies. In this article, we delve into the significance of HTML tags for SEO and explore best practices for leveraging strategic keyword placement to enhance online visibility and drive targeted traffic.
Understanding HTML Tags and Their Role in SEO
HTML (Hypertext Markup Language) tags are the building blocks of web pages, defining the structure and content of a website. From headings and paragraphs to images and links, HTML tags provide search engines with valuable information about the content and relevance of a web page. Properly optimized HTML tags not only improve user experience but also signal to search engines the key topics and themes of a page, influencing its ranking in search results.
Key HTML Tags for SEO and Their Impact
Several HTML tags play a crucial role in SEO by providing search engines with valuable information about the content and context of a web page. Here are some key HTML tags and their impact on SEO:
Title Tag (<title>): The title tag is one of the most important HTML tags for SEO, as it appears as the clickable headline in search engine results pages (SERPs). Strategic placement of target keywords within the title tag can improve the relevance and visibility of a web page in search results, driving click-through rates and organic traffic.
Meta Description Tag (<meta name=”description”>): While not a direct ranking factor, the meta description tag provides a concise summary of the content on a web page and appears beneath the title tag in SERPs. Including relevant keywords and compelling language in the meta description can entice users to click on the search result, improving click-through rates and indirectly impacting SEO performance.
Heading Tags (<h1> to <h6>): Heading tags, particularly the <h1> tag, help structure the content of a web page and provide hierarchical information about the importance of different sections. Strategically placing target keywords within heading tags not only improves readability and user experience but also signals to search engines the main topics and themes of the page, influencing its ranking in search results.
Image Alt Attribute (alt=” ): The alt attribute of an image tag (<img>) provides alternative text for visually impaired users and search engine crawlers. Including relevant keywords in the alt attribute can improve the accessibility and SEO performance of images, helping them appear in image search results and enhancing the overall relevance of the web page.
Anchor Text (<a>): Anchor text, the clickable text within a hyperlink, provides context and relevance to both users and search engines. Using descriptive anchor text that includes relevant keywords can improve the SEO value of internal and external links, helping search engines understand the topic and relevance of linked pages.
To maximize the SEO impact of HTML tags, it is essential to follow best practices for strategic keyword placement:
Research and Identify Target Keywords: Conduct keyword research to identify relevant and high-value keywords for your website and target audience. Choose keywords with sufficient search volume and moderate competition, considering factors such as relevance, search intent, and user behavior.
Place Keywords Naturally and Strategically: Incorporate target keywords naturally within HTML tags, ensuring they fit contextually within the content and enhance readability. Avoid keyword stuffing or over-optimization, as this can negatively impact user experience and trigger search engine penalties.
Optimize Title Tags and Meta Descriptions: Craft compelling title tags and meta descriptions that accurately reflect the content of the web page while incorporating target keywords in a meaningful way. Keep title tags concise (under 60 characters) and meta descriptions informative (under 160 characters) to maximize visibility in SERPs.
Structure Content with Heading Tags: Use heading tags to organize content into logical sections and sub-sections, incorporating target keywords in the <h1> tag for primary headings and <h2> to <h6> tags for subheadings. This helps both users and search engines understand the structure and hierarchy of the content.
Optimize Image Alt Attributes: Include descriptive and keyword-rich alt text for images to improve accessibility and SEO performance. Describe the content and context of the image concisely, incorporating relevant keywords where appropriate.
Diversify Anchor Text: When linking to internal and external pages, use a variety of anchor text that reflects the context and relevance of the linked content. Incorporate target keywords naturally within anchor text while maintaining diversity and avoiding repetitive or spammy linking practices.
Conclusion
Strategic keyword placement within HTML tags is a foundational aspect of effective SEO strategies, helping websites improve their visibility, relevance, and ranking in search engine results. By optimizing key HTML tags such as title tags, meta descriptions, heading tags, image alt attributes, and anchor text, webmasters can enhance the SEO performance of their websites and attract targeted organic traffic. By following best practices for strategic keyword placement and continuously monitoring and refining their SEO efforts, businesses can stay ahead in the competitive online landscape and drive sustainable growth and success.